Prismwave is a flanger, chorus and phaser by UDI DSP.
01 What Prismwave is
Most modulation plugins give you three effects and a switch. Prismwave starts from a different observation: a phaser, a flanger and a chorus are not three effects. They are three points on one continuum, and each of them does the same thing to a sound: it carves a pattern of notches, narrow dips in the spectrum, and moves them.
What makes a phaser sound hollow, a flanger sound metallic and a chorus sound thick is not the circuit behind it. It is how many notches there are, how they are spaced, and how they move. So Prismwave is built as one engine whose notch pattern you shape, with the three classics sitting on it as named stations.
The idea behind every control
Prismwave holds itself to one rule, and it explains everything on the panel:
Every control is a statement about notches: where they sit, how they are spaced, or how they move.
- Morph sets how many notches there are: a few broad ones at the phaser, dozens at the flanger, hundreds at the chorus.
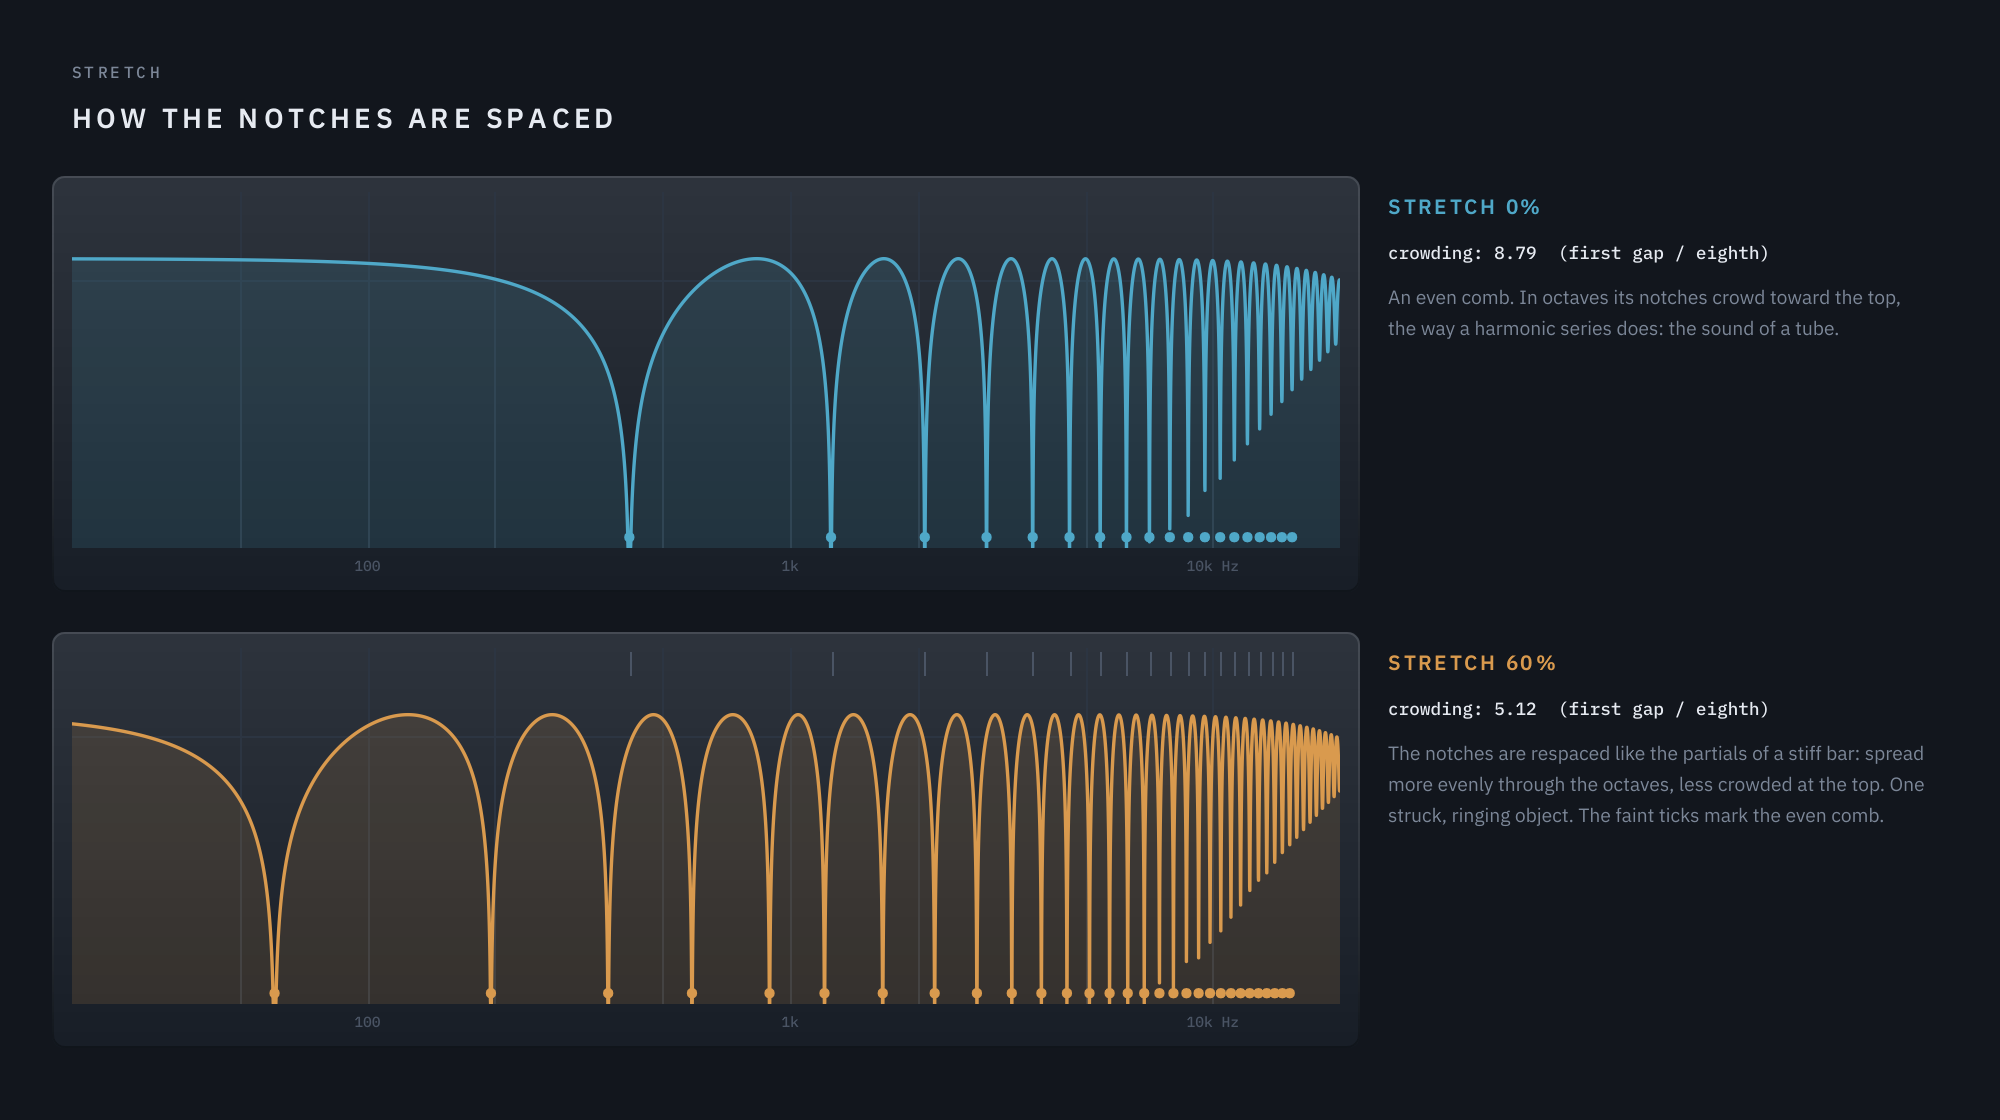
- Stretch sets how they are spaced: an even comb, like a tube, or the uneven spacing of a struck bar.
- Manual sets where they sit, Rate and Depth how they move, Spread how differently they move left and right.
- Regen sets how sharply they ring, Diverge splits the pattern into two, and Through-zero lets the sweep pass through the dry signal itself.
That rule is also why some things are not in Prismwave. A filter section, a distortion, a reverb tank: each would be easy to add, and none of them is a statement about notches.
At a glance
- One engine, one axis. Morph travels continuously from phaser through flanger to chorus, with no crossfades between separate effects.
- Stretch, a spacing control we have not found in any other modulation plugin: it re-spaces the notches the way a stiff bar spaces its partials, turning a comb into a struck, ringing object.
- Two engines pulled apart along Morph by Diverge, combined in Series, in Parallel, left and right, or across a crossover.
- Through-zero flanging, with the crossing either swelling or cancelling.
- A Modulator slow enough to move Morph across a whole phrase, with LFO, envelope and random sources. It and the sweep can lock to the song’s tempo and bars.
- Kind to a mix: the low end stays out of the effect, a Guard keeps attacks clean, and Match keeps the output as loud as the input at any setting.
02 The theory: notches
You don’t need any of this to use Prismwave, but a few pictures make every control obvious.
A delay makes a comb
Add a signal to a slightly delayed copy of itself. At some frequencies the copy arrives exactly half a cycle late, and the two cancel: a notch. One whole cycle further on the same thing happens again, so the notches repeat at an even step of one divided by the delay. A 1 ms delay puts a notch every 1000 Hz.
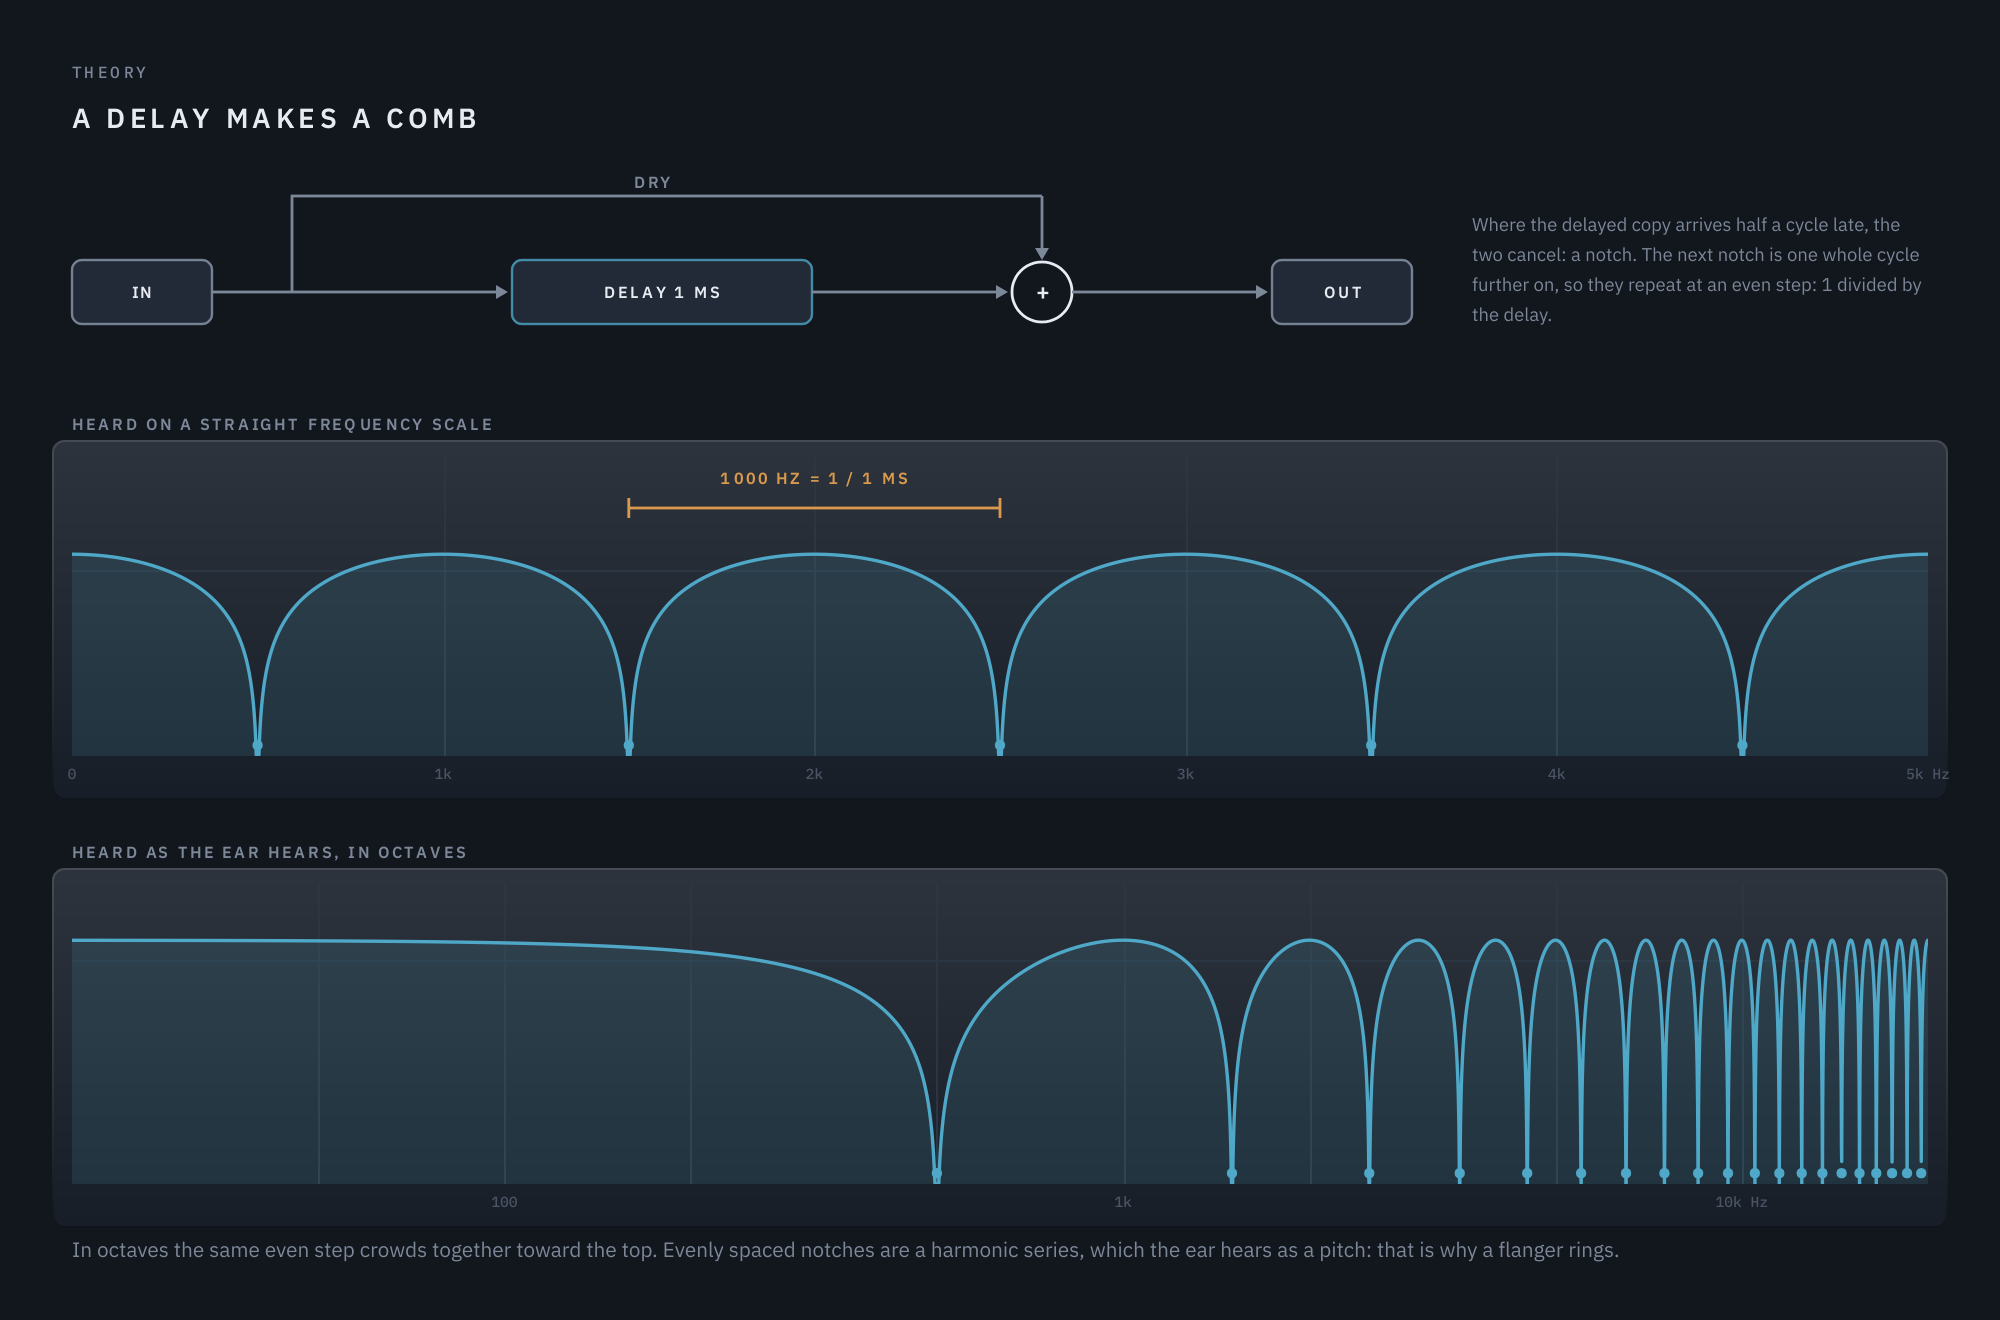
On a straight frequency scale the notches are evenly spaced. The ear hears in octaves, though, and in octaves the same even step crowds together toward the top. Evenly spaced notches form a harmonic series, which the ear hears as a pitch. That is why a flanger rings.
Phaser and flanger: spacing is the difference
A flanger is exactly that delay: many narrow notches, evenly spaced in Hz, and therefore pitched and metallic. A phaser gets its notches from a chain of allpass stages instead, and they come out few, broad, and spaced evenly in octaves. No harmonic series means no pitch, so it sounds hollow.
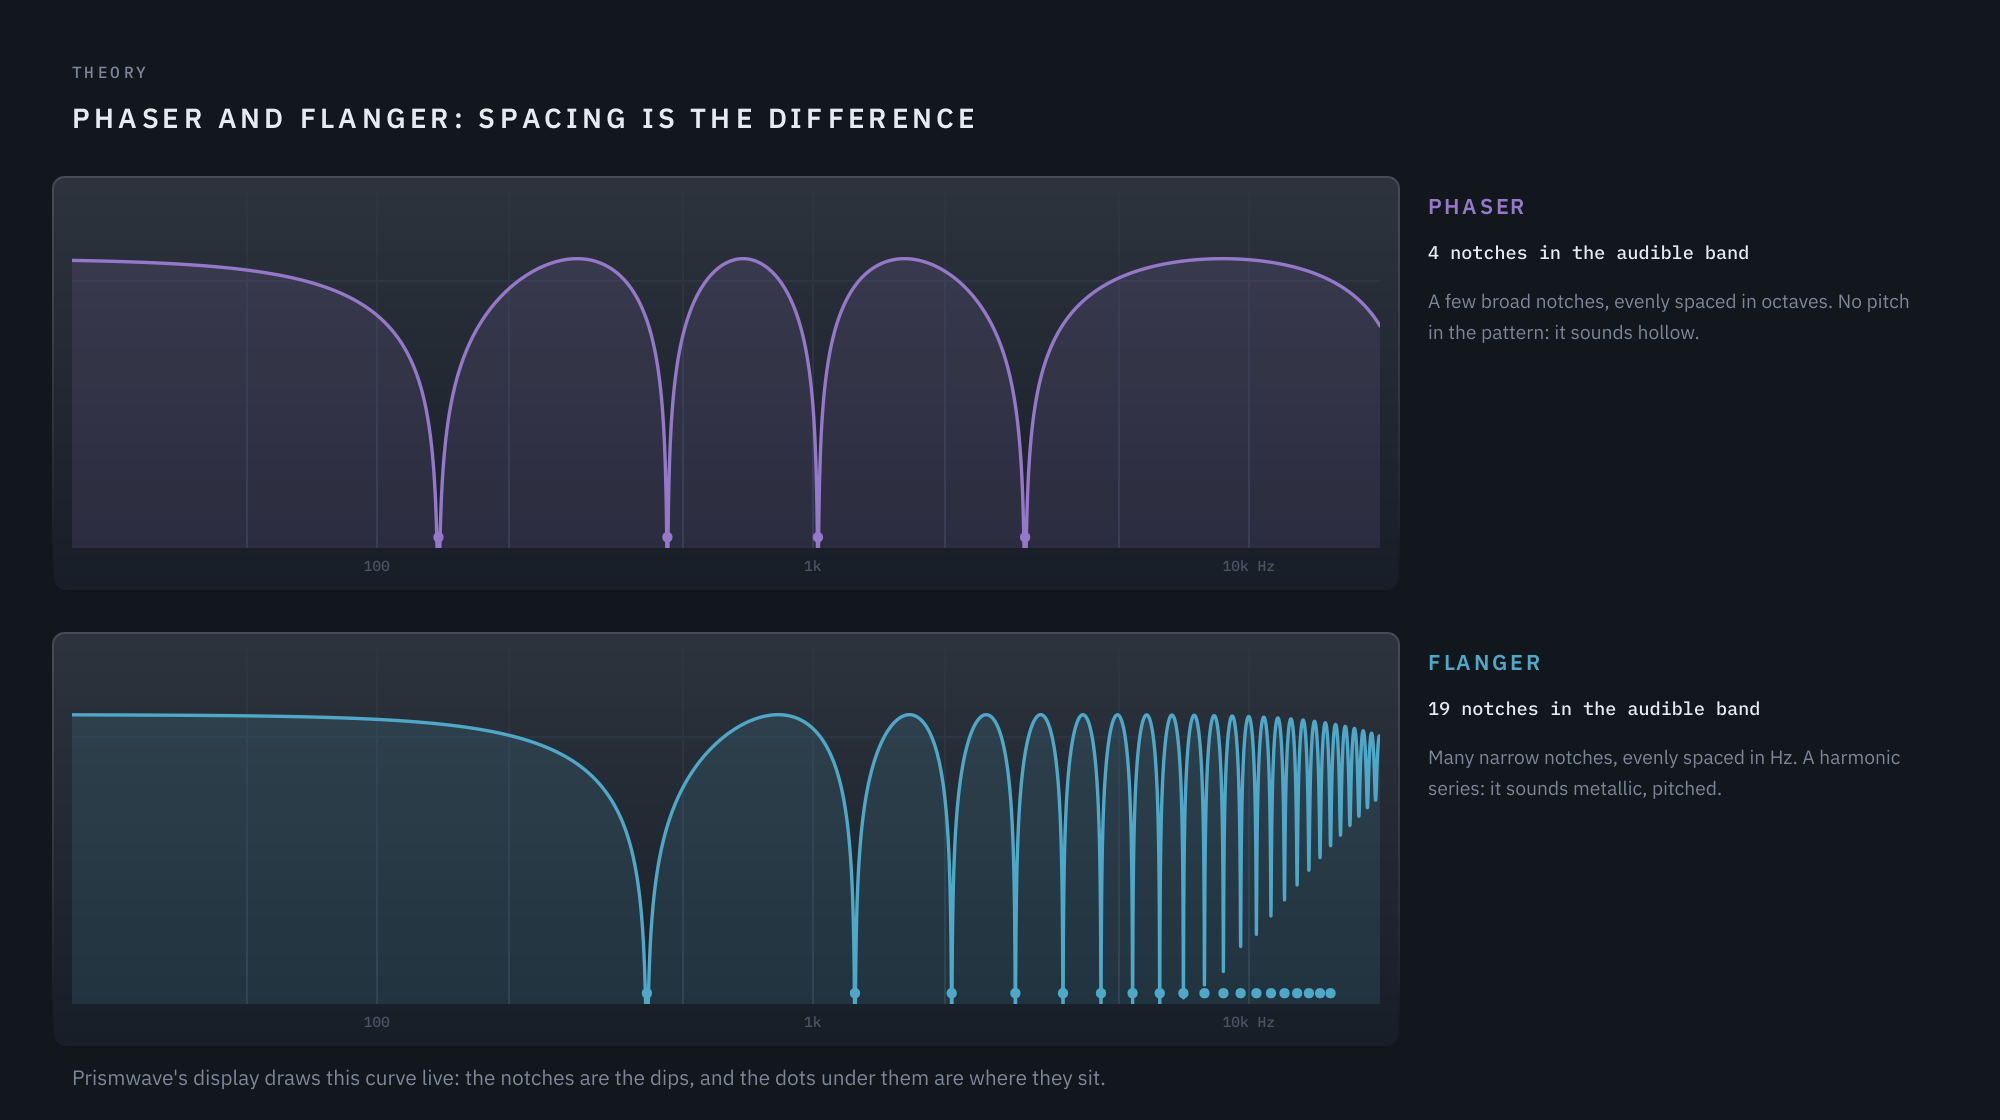
So the whole difference between a phaser and a flanger is arithmetic against geometric spacing. Prismwave’s display draws this curve live, so you can watch it as you turn the knobs.
Feedback rings the comb
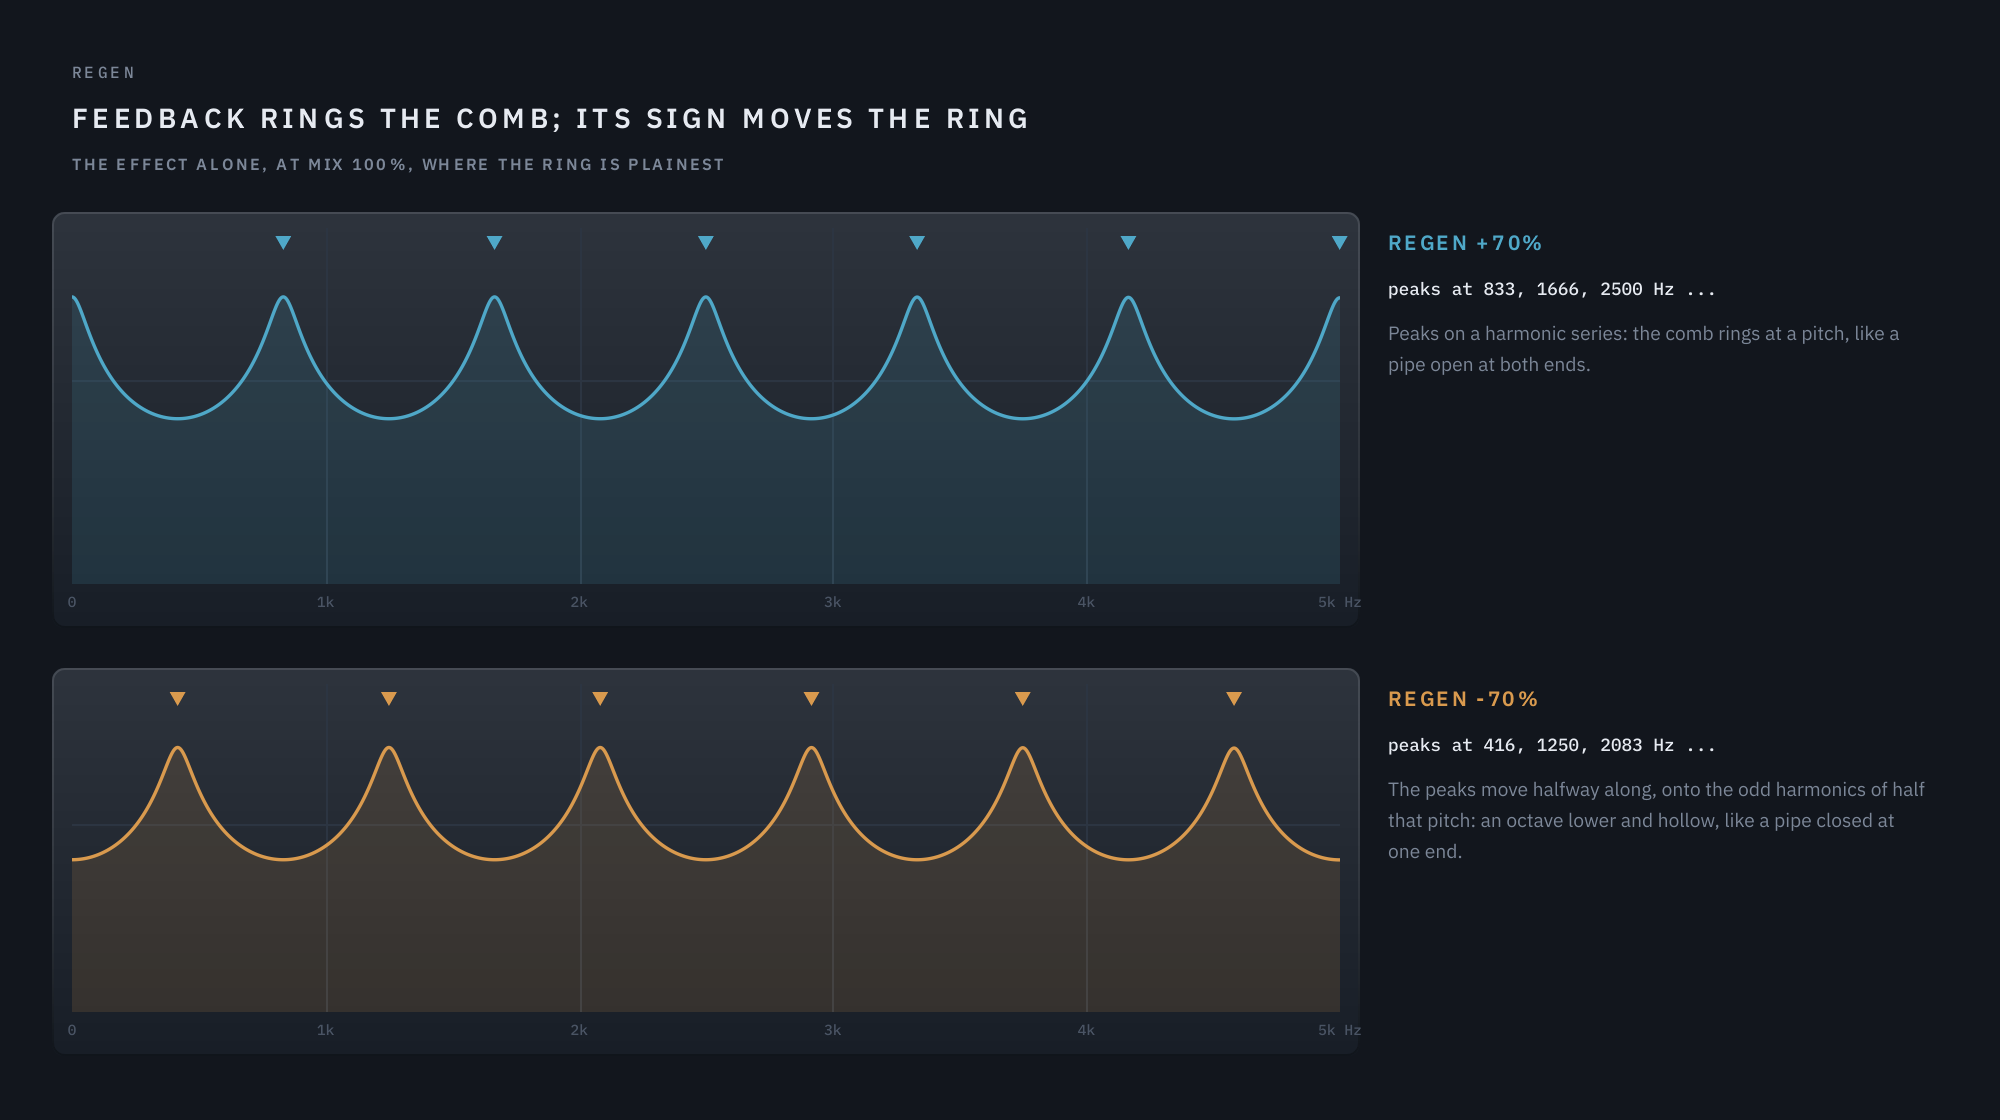
Feed some of the output back into the delay and the spectrum grows peaks that ring at the comb’s pitch: the sound of Regen. The sign matters. Positive feedback puts the peaks on a harmonic series, like a pipe open at both ends. Negative feedback moves every peak halfway along, onto the odd harmonics of half that pitch, an octave lower and hollow, like a pipe closed at one end.
The sweep moves the notches
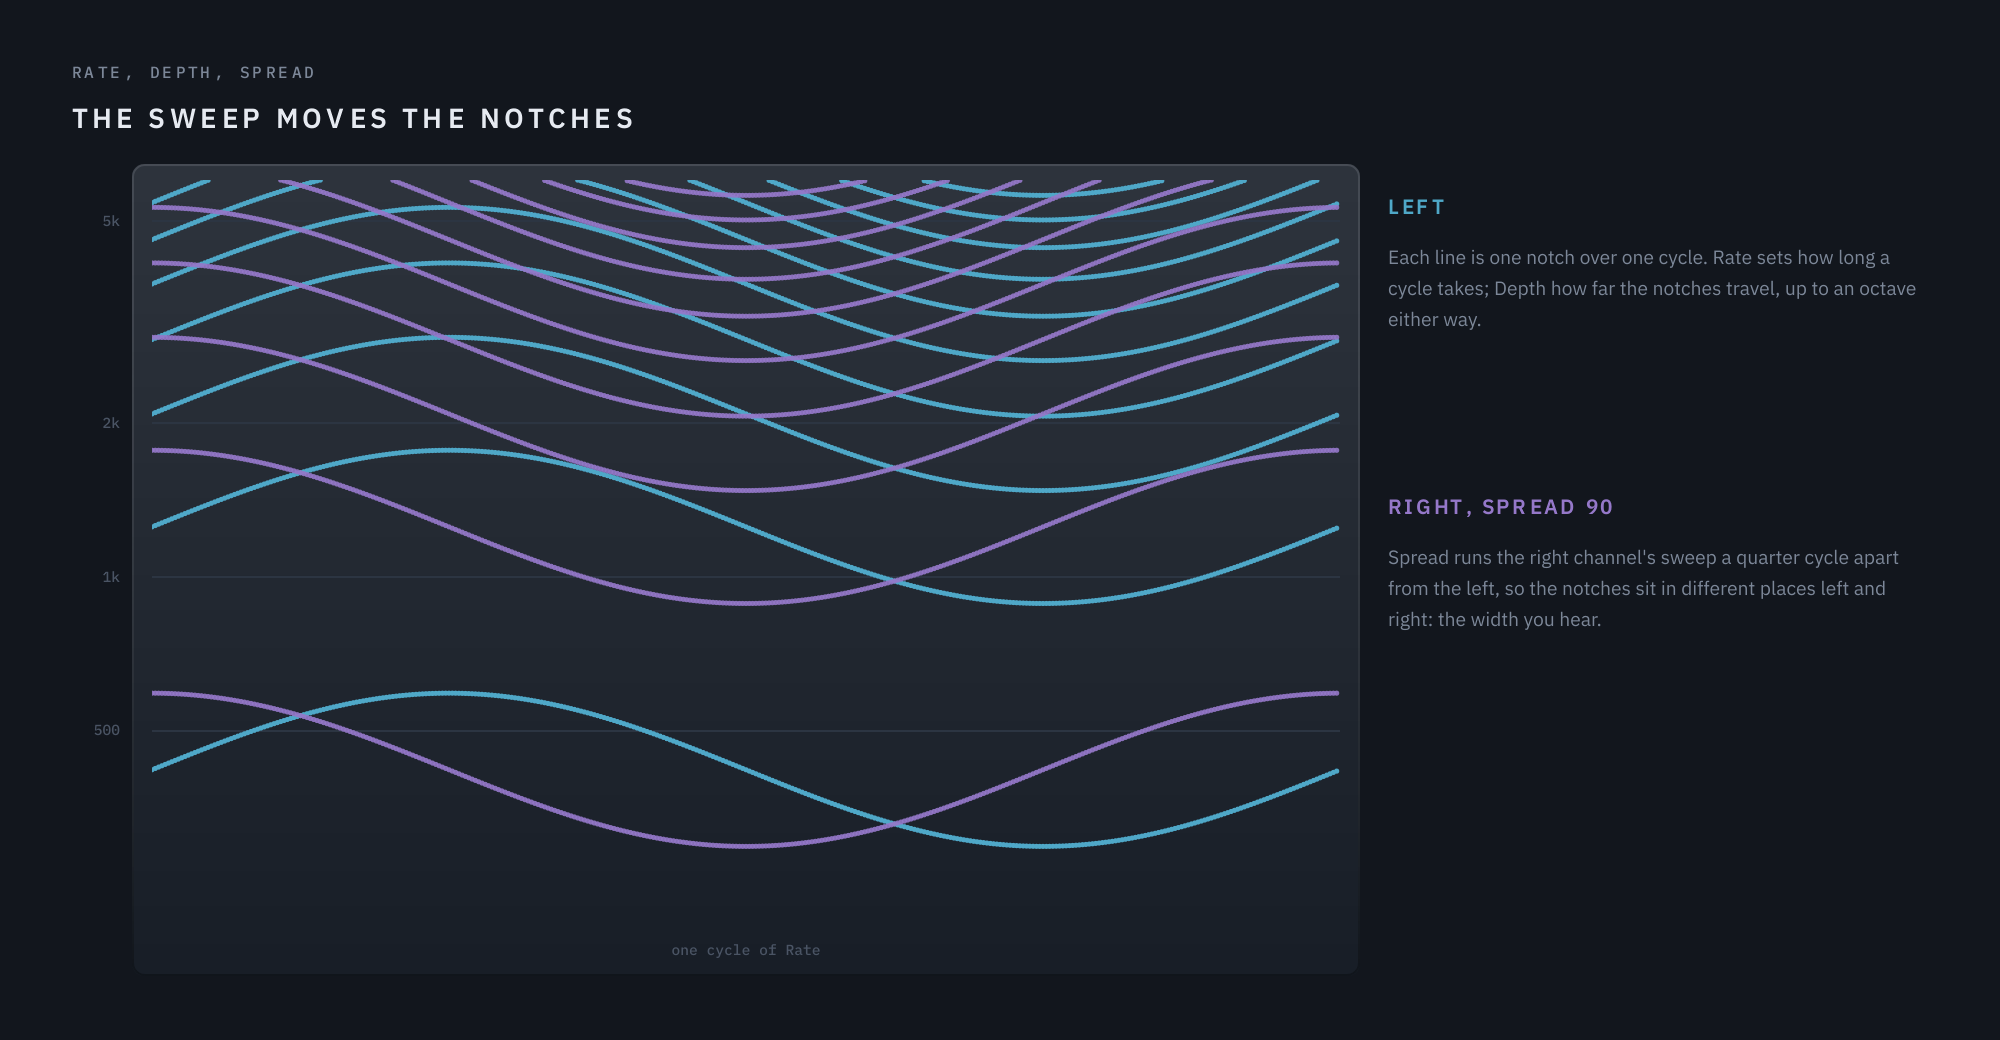
A static comb is only a colour. What makes it an effect is motion: the sweep glides the delay back and forth, and the notches travel up and down the spectrum with it. Rate sets how long one cycle takes, Depth how far the notches travel, and Spread offsets the right channel’s sweep from the left’s, so the notches sit in different places in each ear. That offset is the width you hear.
Chorus: longer delays and more voices
Make the delay longer, around 12 ms and more, and the notches become so dense that the ear no longer hears them as a comb. What you hear instead is the pitch drift of a moving delay, the same slight detune two singers have. Add more delayed voices, each sweeping at a different moment, drop the feedback, and you have a chorus: thick, wide and shimmering, with no ring.
Stretch: a struck object
An even comb is the spectrum of a tube. Real struck objects are not so tidy: a stiff string or a metal bar spreads its partials further apart as they rise, which is part of why a piano’s low strings and a struck bar sound the way they do. Stretch re-spaces Prismwave’s notches along that same physical law. The comb stops sounding like a tube and starts sounding like one struck, ringing object.
Through-zero: past the dry
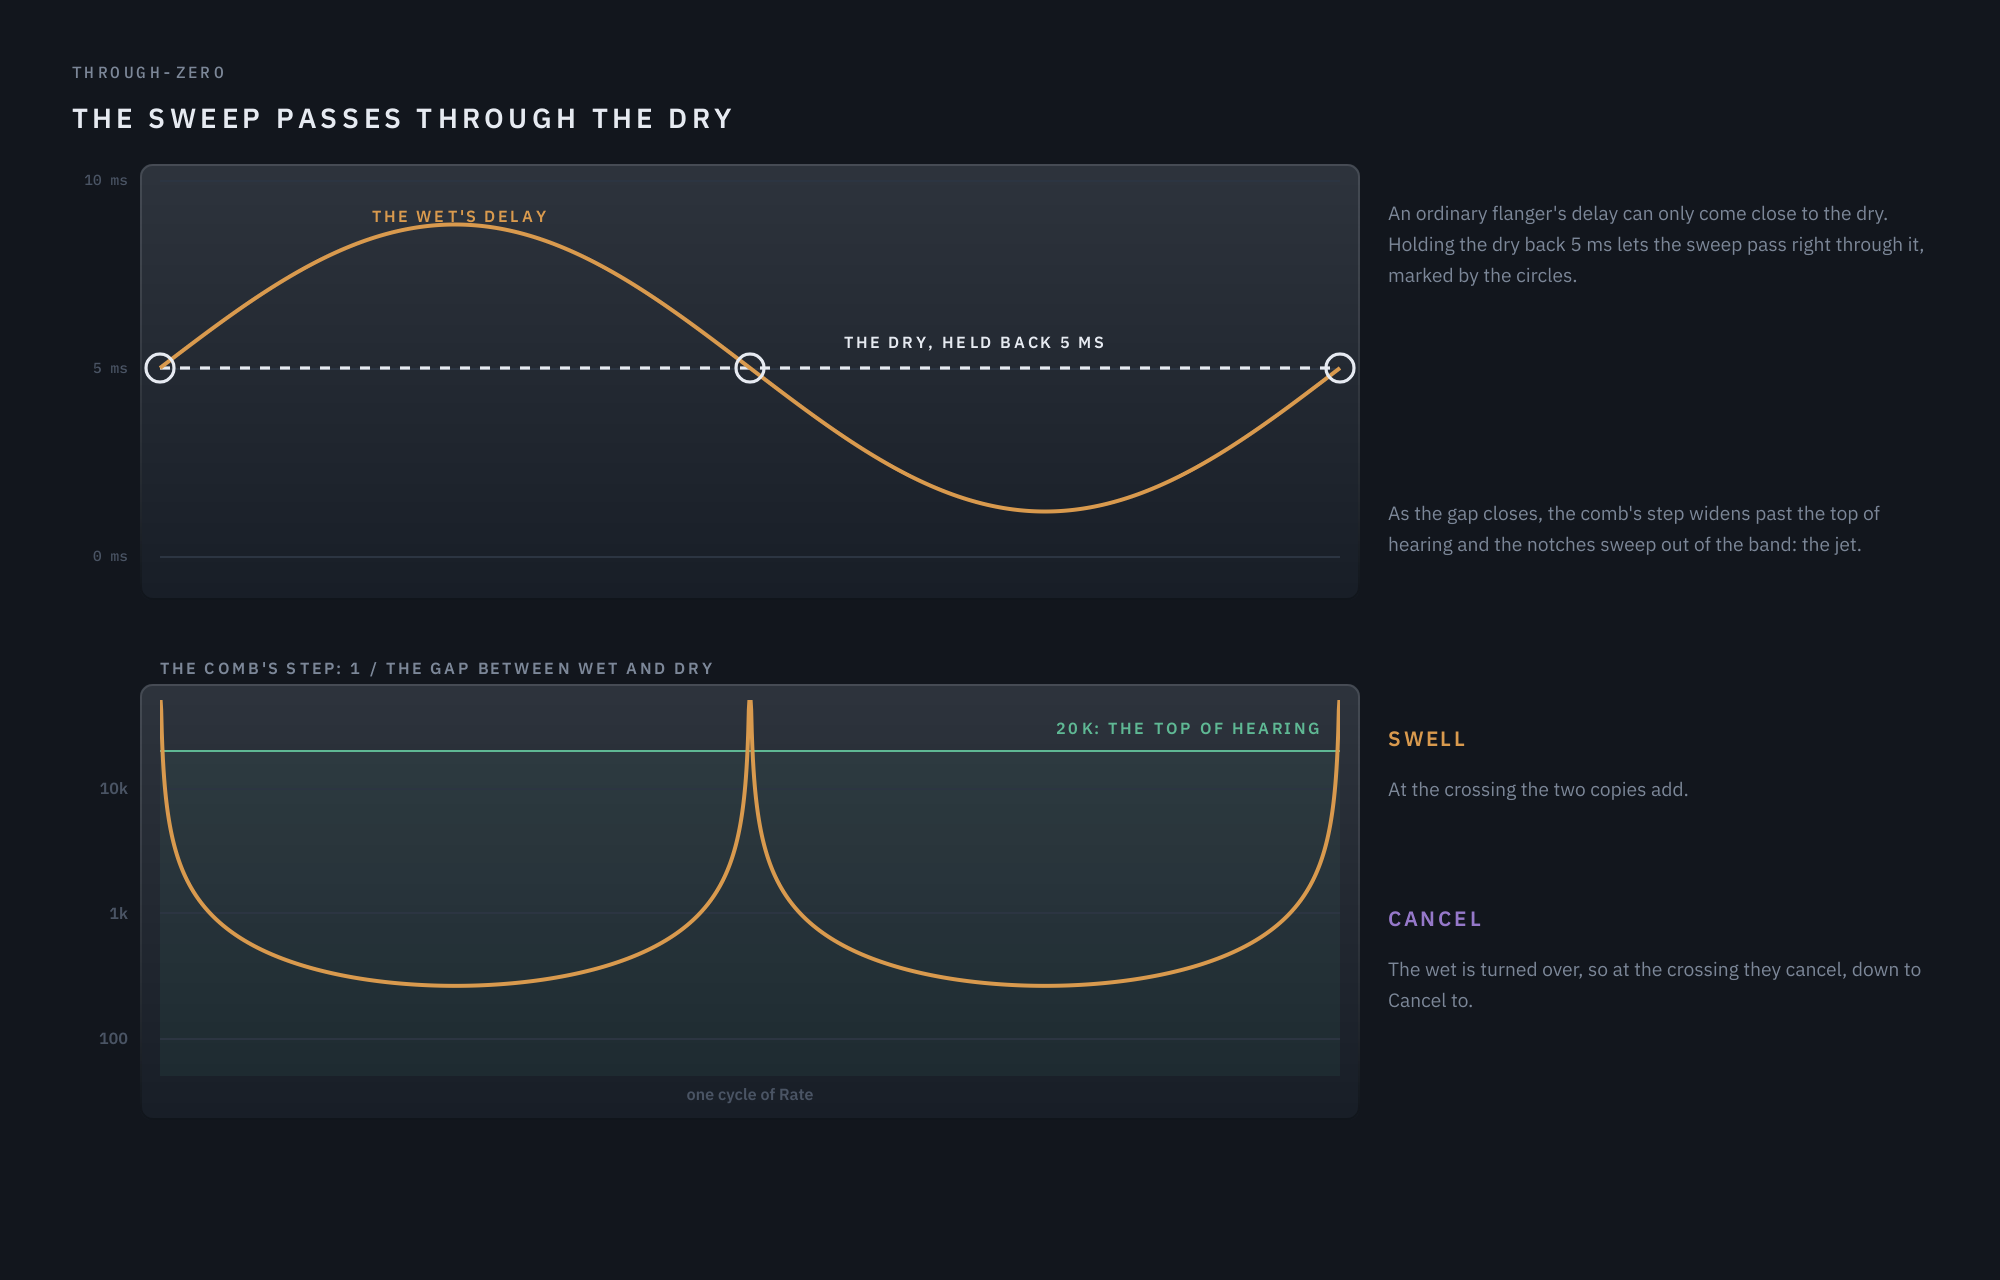
An ordinary flanger’s delay can come close to the dry signal but never reach it, since nothing can arrive before it was played. Through-zero holds the dry back by 5 ms so the sweep can pass right through it. As the gap between the two closes, the comb’s step widens past the top of hearing and the notches sweep out of the band: the tape-flanging jet. At the crossing itself the two copies either add (Swell) or, with the effect turned over, cancel (Cancel).
03 Morph and Stretch: the two axes
Morph is Prismwave’s main axis, and it is an axis of time. At the phaser the delay is a single sample and the notches come from four allpass sections. Toward the flanger the delay grows to about a millisecond, and the notches multiply. Toward the chorus it grows past 12 ms, feedback falls away, and from three quarters of the way two extra chorus voices come in. Nothing is crossfaded: every point in between is a real setting of the same engine, so you can sit anywhere on it.
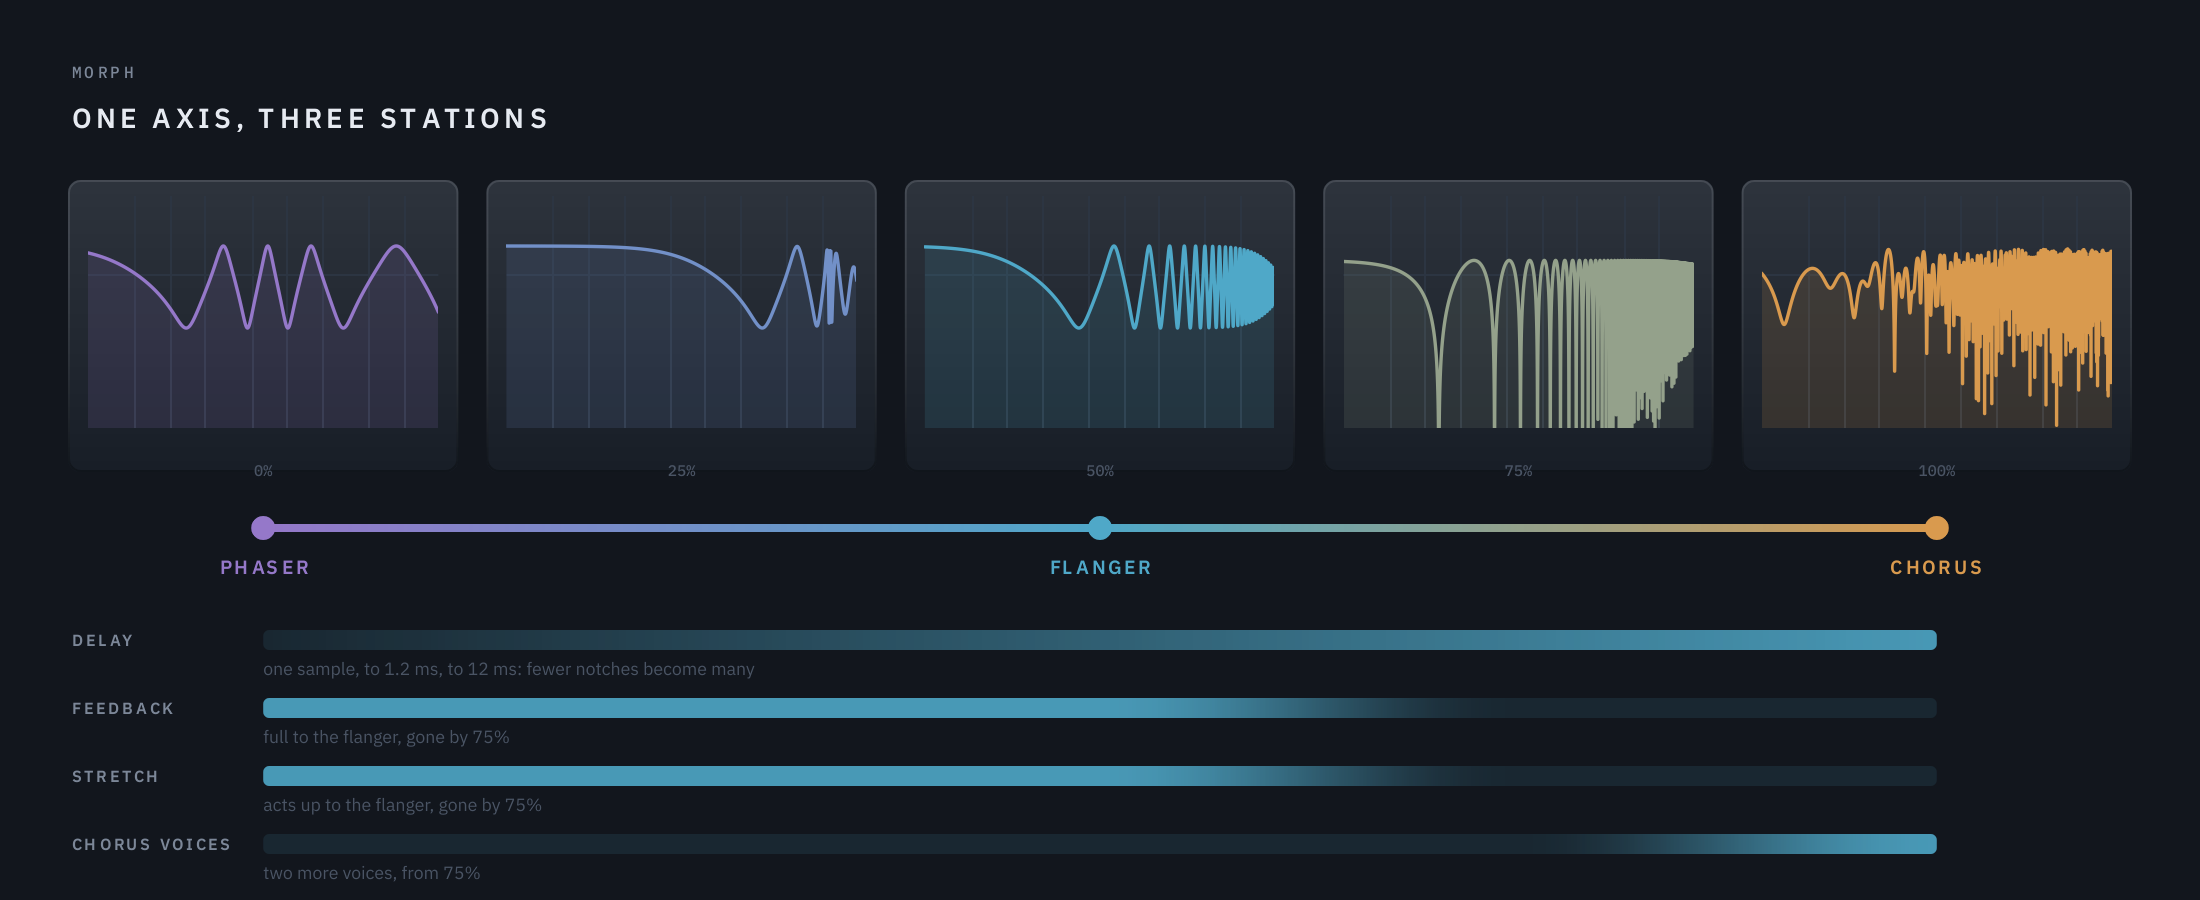
Stretch is the second axis: not how many notches, but how they are spaced. It grows in from the phaser, where it has nothing to act on, to its full effect at the flanger, and fades out again between the flanger and the chorus.
The order of the stations is deliberate. With the phaser at one end, the axis only ever moves one way in delay time, so each half changes different things and nothing doubles back.
04 Signal flow
- A mono source on a stereo track is centred first. Prismwave puts it on both sides and then works in stereo, so Spread and the chorus voices widen it; bypassed, or at Mix 0, it comes back centred.
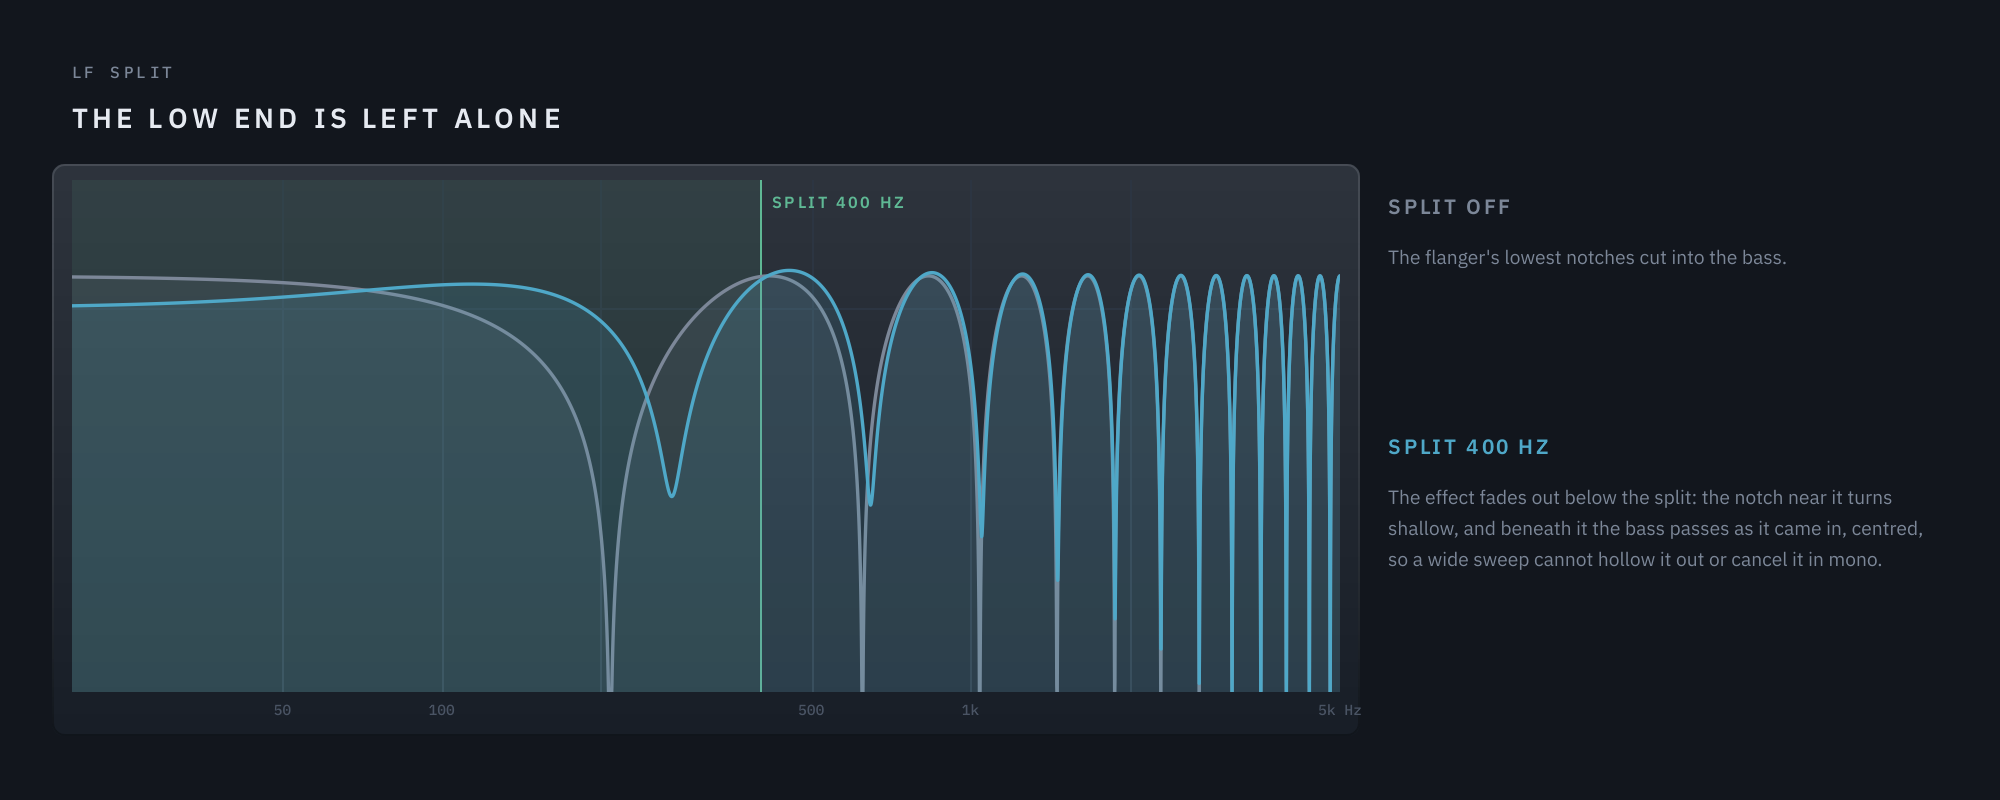
- The low end is handled first. Below the LF Split frequency the signal never enters the engines, so a wide stereo sweep cannot hollow out the bass or cancel it in mono.
- Loop damping is inside the feedback, the Dynamic EQ outside it. Damping shapes every repeat; the EQ shapes the finished effect once.
- The Guard and the Dynamic EQ touch only the effect, never the dry signal.
- At the chorus end the lowest octaves stay dry. Below 250 Hz the dry signal takes over from the mix while the chorus voices are in, so a kick or a bass line stays solid under the shimmer.
- Match and the ceiling come last. Match holds the output at the input’s loudness; the ceiling, a peak limiter, leaves everything under -0.3 dBFS exactly as it is and stops anything from passing 0 dBFS. Both act only while there is any effect in the mix, so at Mix 0 they do nothing at all.
- Through-zero holds the dry path back 5 ms while it is on, and reports that latency to your DAW.
- With no sound coming in, Prismwave rests. Once its own ring has died away it stops working and costs next to nothing, and it starts again on the first sample of sound, with the sweep where it would have been.
05 The panel
Three pages share one header and one display. Main holds everything you need day to day: Shape, Sweep, Feedback and Output. Advanced holds the Modulator, Tuning, loop damping, routing, and the stereo, dynamics and through-zero controls. EQ holds the three-band Dynamic EQ, with Output still on screen. The ADVANCED and EQ buttons sit at the bottom left.
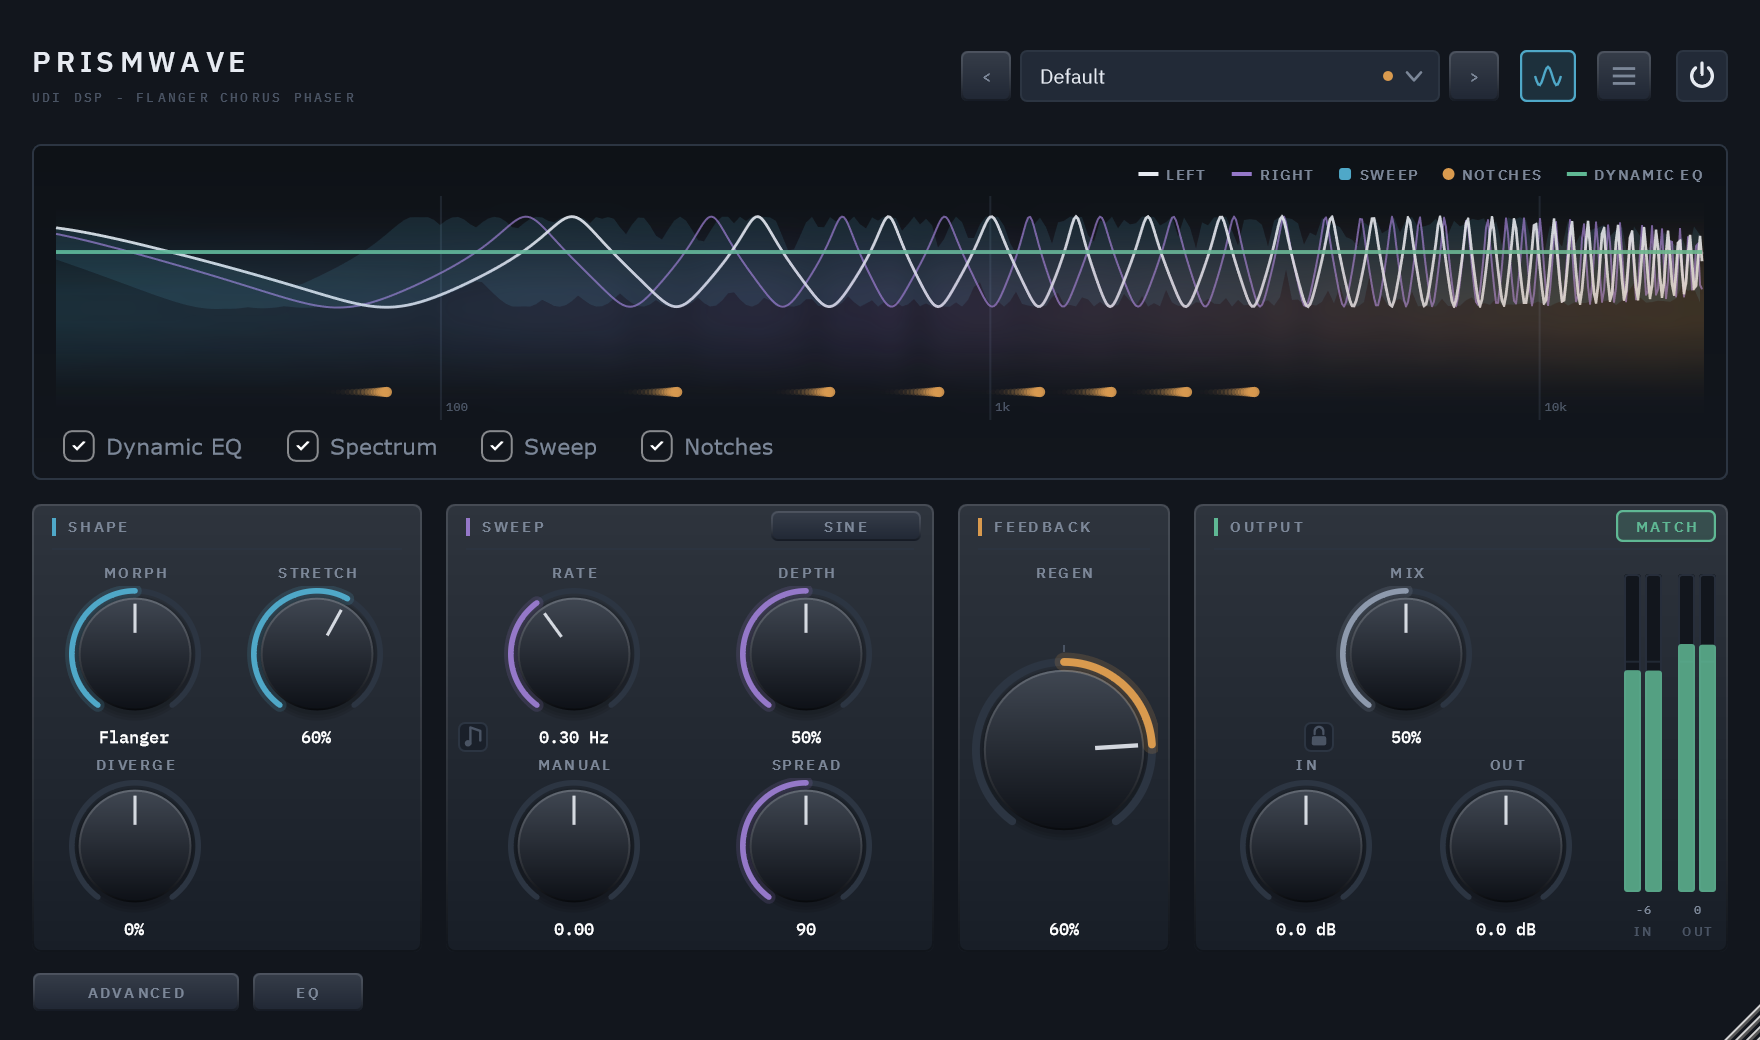
The main page: the display above Shape, Sweep, Feedback and Output.
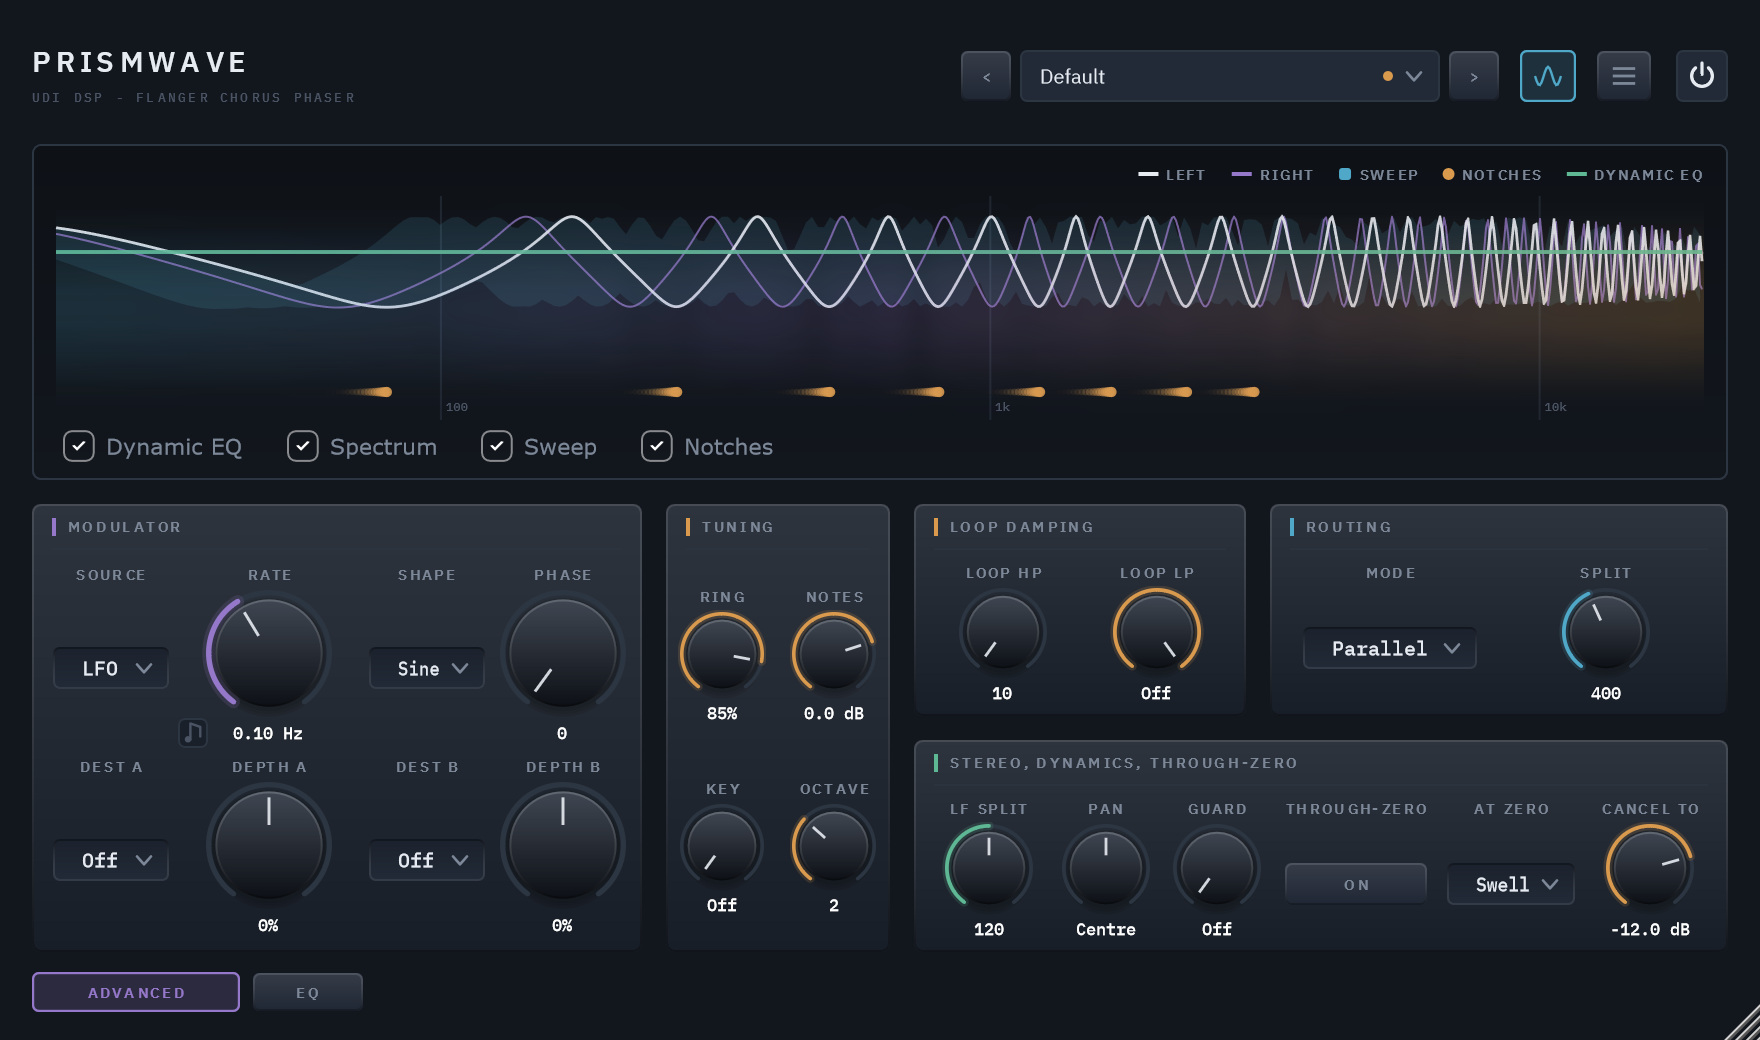
The Advanced page, behind the ADVANCED button.
The header
The name sits at the left. From the right edge inward: the power switch, a bypass with a 20 ms crossfade; the menu, with Panel Size, User Guide, Show Tooltips, Show Display, Copy Diagnostics, Activate, Check for Updates (once activated) and About; the display button, which hides the display and shrinks the window; and the preset field, with arrows to step through presets.
Reading the display
The display is Prismwave’s own response, drawn live from the engine as it runs, on a frequency scale from 20 Hz to 20 kHz.
- Left and Right: the response of each channel, the notches being the dips. It is the feedback loop as it really runs, so at high Regen you can watch Loop HP and Loop LP take the edge off the peaks.
- Sweep: the band the notches travel across over a full sweep.
- Notches: a dot under the bottom of each notch, trailing as it moves.
- Dynamic EQ: the EQ’s curve, when a band is in use.
- Spectrum: the output’s spectrum behind it all.
The checkboxes under the plot turn the Sweep, Notches, Dynamic EQ and Spectrum layers on and off; the Left and Right curves are the display itself and always show. The legend at the top right names the colours.
Presets
The preset field shows the loaded preset, with a dot beside its name once you change anything. Click it for the preset menu: the Factory presets in categories, your own presets under User, and Save, Save As, Delete and Open Preset Folder. A slash in a name you save files it in a folder. See chapter 09.
Resizing
Drag the bottom-right corner, or choose a Panel Size from the menu. The panel keeps its proportions.
Trial and activation
Prismwave comes with a 14-day trial. The first time you open it, a card offers one. The trial starts in your browser, with a quick sign-in, which is also where a licence you’ve bought is activated; the card’s Start trial or activate button takes you there. Close the card and the badge in the header reads START TRIAL: click it, or choose Activate from the menu, whenever you are ready. During the trial the badge counts the days left, TRIAL 12D, and Prismwave works in full.
Before a trial starts, and after it ends, Prismwave runs in demo mode: a short burst of noise plays after every 45 seconds or so of audio, in renders too, at a level that follows the music. Everything else works. Once the trial has ended the badge reads DEMO. Activating a licence removes the badge and the noise; Check for Updates in the menu then tells you when a new version is out.
06 Controls
Listed in the order they appear on the panel, page by page, left to right and top to bottom. Every control is automatable and saved with your project. Hover over any control for a tooltip.
SHAPE — What the notch pattern is. Top left of the main page.
Morph
Phaser – Flanger – Chorus · default Flanger
How many notches there are: the phaser’s few broad ones at the left, the flanger’s comb in the middle, the chorus’s dense, voiced pattern at the right, and every setting in between. The readout names the station, or how far you are between two. See chapter 03.
Stretch
0 – 100% · default 0%
How the notches are spaced: an even comb at 0, a struck, ringing object further up. Most of the change happens in the first two thirds of the knob. It grows from nothing at the phaser, where Morph has left it nothing to space, to its full effect at the flanger, and fades out on the way to the chorus. Leaving 0, or returning to it, it takes about a tenth of a second to come in, so a preset that changes it does not jump. See chapter 02.
Diverge
-100% – +100% · default 0%
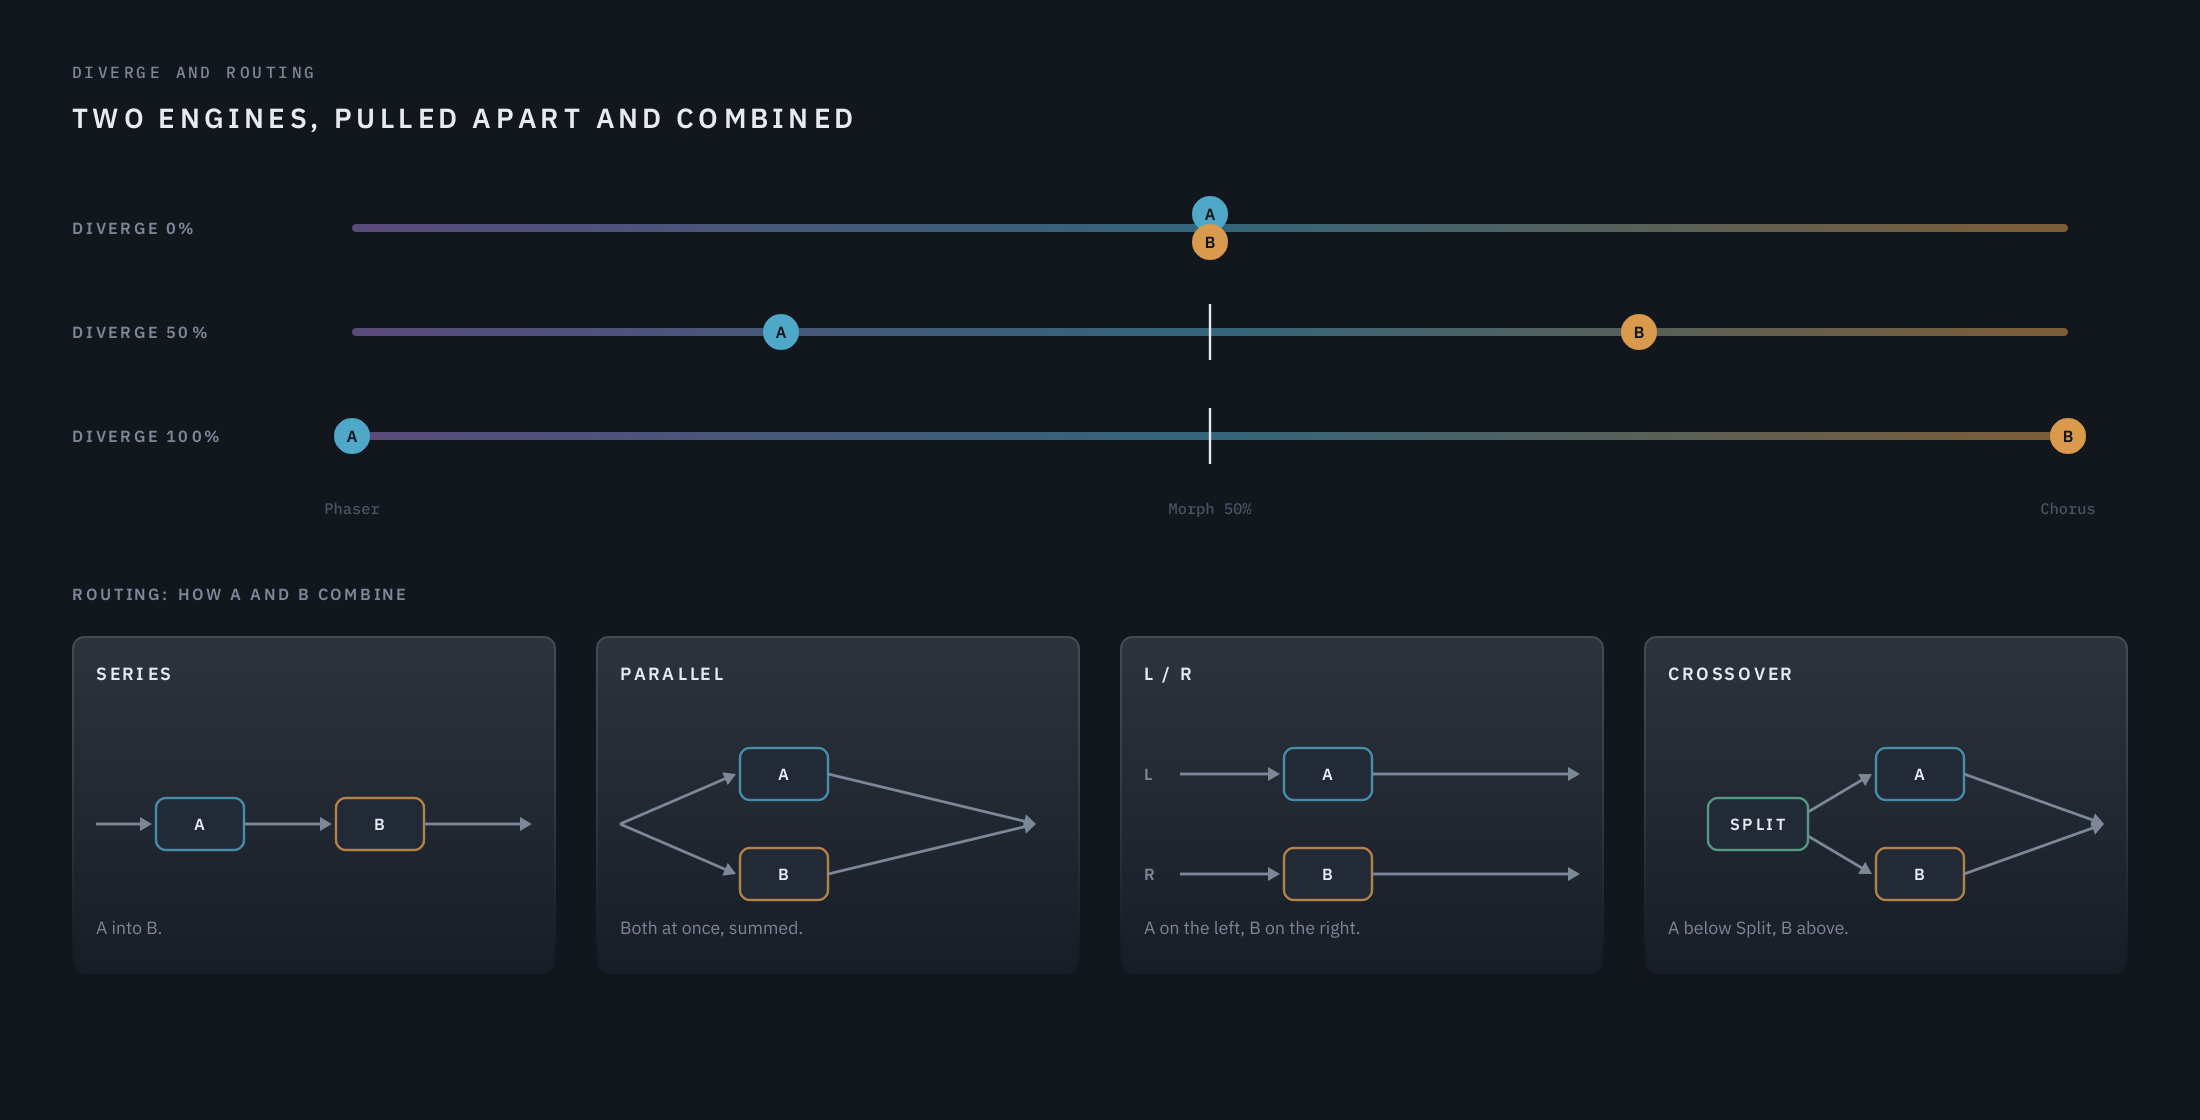
Splits the effect into two engines and pulls them apart along Morph. At 0 both engines sit exactly where Morph is: one sound. Turned up, engine A moves toward the phaser and engine B toward the chorus, each by the same share of the room it has, so at 100% the pair spans phaser to chorus wherever Morph sits. Negative values swap which engine goes which way. How the two combine is set by Routing, on the Advanced page.
SWEEP — How the notches move.
Rate
0.02 – 20 Hz · default 0.30 Hz · or synced: 1/32 to 16 bars, straight, triplet or dotted
How fast the sweep cycles. At fast rates the depth is held back automatically, so the pitch wobble a moving delay makes never passes about 85 cents.
The note button at the knob’s lower left syncs it to the song. Each click steps from Free to Straight, Triplet and Dotted, then back to Free, and while synced the knob picks the note value. Synced, the sweep follows the song’s bars while the host plays, so the same bars always sound the same. When you loop or jump, it glides back into step rather than jumping, because a jump in a moving delay would click: a second or two at ordinary note values, longer at slow ones, since the catch-up never runs faster than half the sweep’s own rate. Press play on a silent track and it starts in step at once. With the transport stopped it runs at the tempo’s rate. A bar is four beats, whatever the song’s time signature. A note value the tempo would push past 20 Hz plays at 20 Hz, and one it would take under 0.02 Hz plays at 0.02 Hz, unlocked in both cases.
Depth
0 – 100% · default 50%
How far the notches travel, up to an octave either way. At 0 the sweep is parked and the pattern stands still.
Manual
-2 – +2 octaves · default 0
Where the pattern sits: the phaser’s corner, the flanger’s comb, or the chorus’s delay, moved up or down by up to two octaves. With Depth at 0, this is the only thing placing the notches. With Through-zero on, it places where the sweep crosses the dry instead.
Spread
0 – 180° · default 90°
How far apart the left and right sweeps run. At 0 both channels move together; at 180 they move in opposite directions, for the widest image. Turning it glides the right channel to its new place over a fraction of a second, so a preset or an automation step never jumps the sweep.
Shape
Sine, Triangle, Rise, Fall · default Sine — the button in SWEEP’s title
How the sweep travels. Sine slows as it nears each end of its travel and lingers there: the classic, rounded sweep. Triangle moves at an even speed and turns around at once, so the notches glide steadily before they reverse. The difference is subtle: listen for it on a slow, deep flanger or phaser sweep. In the chorus the three voices move out of step with each other, so the two shapes sound almost the same there. Rise and Fall are the barber-pole: the notches climb, or fall, and never come back, like the stripes on a barber’s pole. Three copies of the engine an octave apart take turns, each fading in at the bottom of its travel and out at the top, so the climb has no restart you can hear. Rate sets the speed, one octave per cycle, so 0.30 Hz climbs 0.3 octaves a second and a synced 1 Bar climbs an octave a bar. The climb is held under the same speed limit as any sweep, which only shows toward the chorus, where the delays are long: about 1.2 octaves a second there, and a synced climb asked to go faster runs at that speed and no longer follows the bars. Manual sets where the climb is centred, within an octave and a half either way; Depth has nothing to do here, and neither has Through-zero, which stands aside while the climb runs. It is clearest on a phaser and on bright, sustained sounds, and it costs about twice the processing while it is on. While Key is set, Rise and Fall wait, because a climb would pull Key’s note out of tune: the button dims to say so, and the climb starts when Key goes back to Off.
Click the button for the next shape; it lights while the shape is not Sine. A change crossfades over a tenth of a second, so switching mid-sweep never clicks.
FEEDBACK
Regen
-100% – +100% · default 50%
Feedback: how sharply the notch pattern rings. Positive values ring on a harmonic series; negative values move the peaks halfway along, for a hollow sound an octave lower. The feedback loop saturates softly, so even at the extremes it cannot run away. Regen fades out toward the chorus, where a chorus has no feedback. See chapter 02.
Ring / Notes / Key / Octave
Ring 0 – 100% · default 85% · Notes Off – +12 dB · default 0 dB · Key Off, C – B · default Off · Octave 1 – 4 · default 2
These four live in TUNING, on the Advanced page, beside the Modulator: they are what you set up when you want to play the plugin, rather than what you reach for in every session.
Key tunes the loop to a note even with nothing played, so its ringing lands on that note and its harmonics: a plucked string in the song’s key. Set Key to the root of the track and Octave to where it should sit. Ring sets how long the note rings, and while Key is on Regen only chooses the tone: positive for the whole harmonic series, negative for the odd harmonics alone, a hollower sound. Moving Regen across zero glides from one tuning to the other in about a fifth of a second. Stretch keeps the note and bends the harmonics above it out of tune, toward a bell. While Key is on the sweep stops, because any movement would pull the note out of tune, and so do Rise and Fall; Rate and Depth come back when you set Key to Off. Through-zero stands aside for Key as well: a loop cannot be tuned to a note and run in the dry signal’s own time at once. Key reaches from the phaser to the flanger, holds its tuning for as long as it rings, and fades out by three quarters of the way to the chorus, where there is no feedback left to tune. A louder input pulls the note slightly flat, the way a real resonator does when it is driven hard.
Ring is the tuned loop’s own feedback: how long a note rings on, Key’s note or one you play. Below about 80% a note is a colour rather than a pitch, and it is separate from Regen on purpose, so wanting a singing note does not force a screaming flanger. Above its default of 85% the notes you play are also turned down a little, about 4.5 dB at 100%, so even a long-ringing low note sits just under the output’s ceiling and a chord does not drive it. Notes is how loud your playing sits against the rest of the effect: 0 dB is where the notes sit on their own, turn it up to bring them forward, or all the way down for Off. Notes does nothing until MIDI notes arrive.
Playing it with MIDI. Route MIDI to Prismwave and held notes tune loops of their own, up to eight at a time: a note opens its loop, letting whatever audio is passing through ring on that note, and letting go closes it again. It is the same tuning as Key, once per note: Ring decides whether a note sings or just colours, Notes sets how loud it sits, and the notes fade out toward the chorus as Key does. Each note’s own loop stands still, so it stays in tune, while the flanger underneath keeps sweeping. While anything is held, MIDI takes over from Key: Key’s drone steps aside, and the sweep and Regen come back under the notes; let go, and Key’s own note returns. (With Key set, Rise and Fall stay off even while notes are held, and the Shape button stays dimmed.)
A few things worth knowing before you play:
- The notes ring what the track is playing. A voice is fed by the audio passing through, so on a silent track they are silent too.
- Velocity sets each note’s level. A chord is levelled so that it is about as loud as one note, however many notes it has.
- A ninth note takes the place of another: one you have already let go if there is one, otherwise the oldest.
- Played notes always ring on the whole harmonic series, whatever Regen’s sign.
- The sustain pedal, pitch bend and the mod wheel are not used. All Notes Off lets the notes ring out; All Sound Off stops them at once.
- Notes play from C1 up, the same range as Key; lower notes are ignored. Prismwave counts octaves with middle C as C4 (MIDI note 60), so its C1 is MIDI note 24. Many DAWs call middle C “C3”, and show that same note as C0.
- Only the notes you actually hold cost anything, so one note is far cheaper than eight.
With Ring high the note is bright and metallic: that is what a feedback comb is, and it is the plucked-string sound this borrows. Three things tame it. Loop LP (Advanced page) around 3-5 kHz takes the top off each repeat, for a damped string rather than a spring. Stretch bends the harmonics above the root, moving it from string toward bell. Ring between 50 and 70% leaves a resonant colour rather than a note, which sits under a mix more easily.
OUTPUT — On the main and EQ pages, so your levels are in reach while you work.
Mix
0 – 100% · default 50%
The balance between the dry signal and the effect, at equal power. At 0 the output is the input, sample for sample. Two settings aside: in the Crossover routing, and at the chorus end of Morph, the dry signal passes through a crossover, and comes out at the same level with its phase turned around the split.
The notches are the effect cancelling against the dry signal, so they are deepest at 50%. At 100% there is no dry signal left to cancel against, and what remains is the effect alone: a vibrato at the flanger, a gentle smear at the phaser.
In / Out
±24 dB · default 0 dB
Trims at either end of the chain. In comes before everything else, and the level going into the feedback loop changes how hard high Regen saturates. Out comes after the mix. The meters beside them show the level coming in and going out.
Match
On / Off · default On
The switch at the top right of OUTPUT. On, Prismwave keeps the output as loud as the input, whatever Morph, Regen or Mix would do to the level, so a setting sounds better or worse on its own merits rather than louder or quieter. It predicts the change from its own response and the music’s spectrum, so it follows a knob as you turn it, and a slow correction covers the rest. Its makeup stops at 12 dB either way, and it works from the two engines’ response, which the notes you play are not part of: they add their own level on top, and Notes sets it. Off, the effect adds or takes away level the way a flanger normally does.
A ceiling keeps the output below 0 dBFS either way, while the effect is in. It is a peak limiter: anything under -0.3 dBFS passes exactly as it is, and a peak that would go over is turned down cleanly rather than clipped, then let go again. Leave headroom for resonant settings. High Regen, Ring, Key and the notes you play make peaks well above the input’s own, and on material recorded right up to full scale the limiter then holds them, so the output comes out a decibel or two quieter than the input. With the track’s peaks a few decibels under full scale, or In turned down a little, it has nothing to do.
Lock
Locked / Unlocked · default Unlocked
The small padlock beside Mix’s value. Locked, loading a preset leaves Mix, In and Out where you have them, so you can step through presets at the blend and levels you have already set, and hear each one in your track rather than on its own terms. Because In sets how hard the loop is driven, every preset is then driven at your level too. Everything else in the preset loads as usual, Match included. A preset you save still stores Mix, In and Out, and moving them does not mark the loaded preset modified while the lock is on. The lock belongs to this instance of the plugin and is saved with your session, never in a preset.
ADVANCED — MODULATOR — A second source of motion, much slower than the sweep, for movement across a phrase.
Source
LFO · Envelope · Random · default LFO
What drives the two slots. LFO is a slow cycle. Envelope follows the input’s level: quiet sits at the start of the range, loud moves toward the end. Random moves to a new value once per cycle of Rate, gliding between them so nothing jumps.
Rate
0.01 – 8 Hz · default 0.10 Hz · or synced: 1/32 to 16 bars, straight, triplet or dotted
How fast the LFO cycles, or how often Random moves. At the bottom, one cycle takes 100 seconds.
Its note button syncs it exactly as the sweep’s Rate does: synced, the LFO follows the song’s bars, and Random takes each new step as a cycle begins, so its steps land on the grid. At 16 bars, one cycle spans a long phrase.
Shape
Sine · Triangle · default Sine
The LFO’s shape. Sine lingers at the ends of its swing; Triangle moves at an even speed.
Phase
0 – 360° · default 0°
Offsets the Modulator’s LFO against the sweep, so the two circulate rather than pulse together. Envelope and Random have no phase to offset. A change of Source, Shape or Phase is taken up over a quarter of a second, so switching while it plays never jumps.
Dest A / Dest B
Off · Morph · Stretch · Regen · Mix · Sweep · Diverge · Pan · default Off
What each slot moves. Two slots on the same destination add together. Sweep is the sweep’s Depth, so it has nothing to move while the shape is Rise or Fall, or while Key is on.
Depth A / Depth B
-100% – +100% · default 0%
How far each slot moves its destination, in either direction. The swing is fitted to the room the control has: at 100% it reaches exactly the end of the range at the source’s peak and never stalls against it.
ADVANCED — LOOP DAMPING — Filters inside the feedback loop, so every repeat is shaped again.
Loop HP
10 – 2000 Hz · default 10 Hz
Cuts lows inside the loop, so high Regen doesn’t build up rumble.
Loop LP
1 – 20 kHz · default Off
Cuts highs inside the loop: each repeat is softer than the last, for a darker, gentler ring.
ADVANCED — ROUTING — How Diverge’s two engines combine. It matters most once Diverge pulls them apart.
Mode
Series · Parallel · L / R · Crossover · default Parallel
Series: B processes A’s output blended evenly with the dry, so the two patterns stack. Unlike the others, it changes the sound even at Diverge 0. Parallel: both at once, averaged. L / R: A on the left channel, B on the right. Crossover: A below the Split frequency, B above it, with the dry signal passed through the same crossover so the two halves stay aligned.
At Diverge 0 the two engines are the same, so Parallel and L / R sound exactly alike, and Crossover very nearly: the routing starts to matter as Diverge pulls them apart.
Split
100 – 8000 Hz · default 400 Hz
Crossover’s frequency: engine A plays below it, engine B above.
ADVANCED — STEREO, DYNAMICS, THROUGH-ZERO
LF Split
Off – 400 Hz · default 120 Hz
Below this frequency the effect leaves the sound alone. The low band skips the engines entirely and is centred as the effect comes in, so the bass stays solid and survives a fold to mono. The split is gentle, so the effect fades out below it rather than stopping dead. Turn it to the bottom for Off.
Pan
L 100 – Centre – R 100 · default Centre
Where the effect sits across the image. Only the effect moves: the dry signal stays exactly where it was, so the source stays planted and the effect swirls around it, which is what panning both would not give you. It is a balance rather than a fold to mono, so Spread’s width comes along; at the far ends one side of the effect fades out and the other is lifted to match, keeping the loudness. The low band below the LF Split is dry and centred, and Pan leaves it there.
Point the Modulator at Pan to have the effect circle the source; with Phase offsetting it against the sweep, the motion circulates instead of pulsing.
Guard
0 – 100% · default 0% (Off)
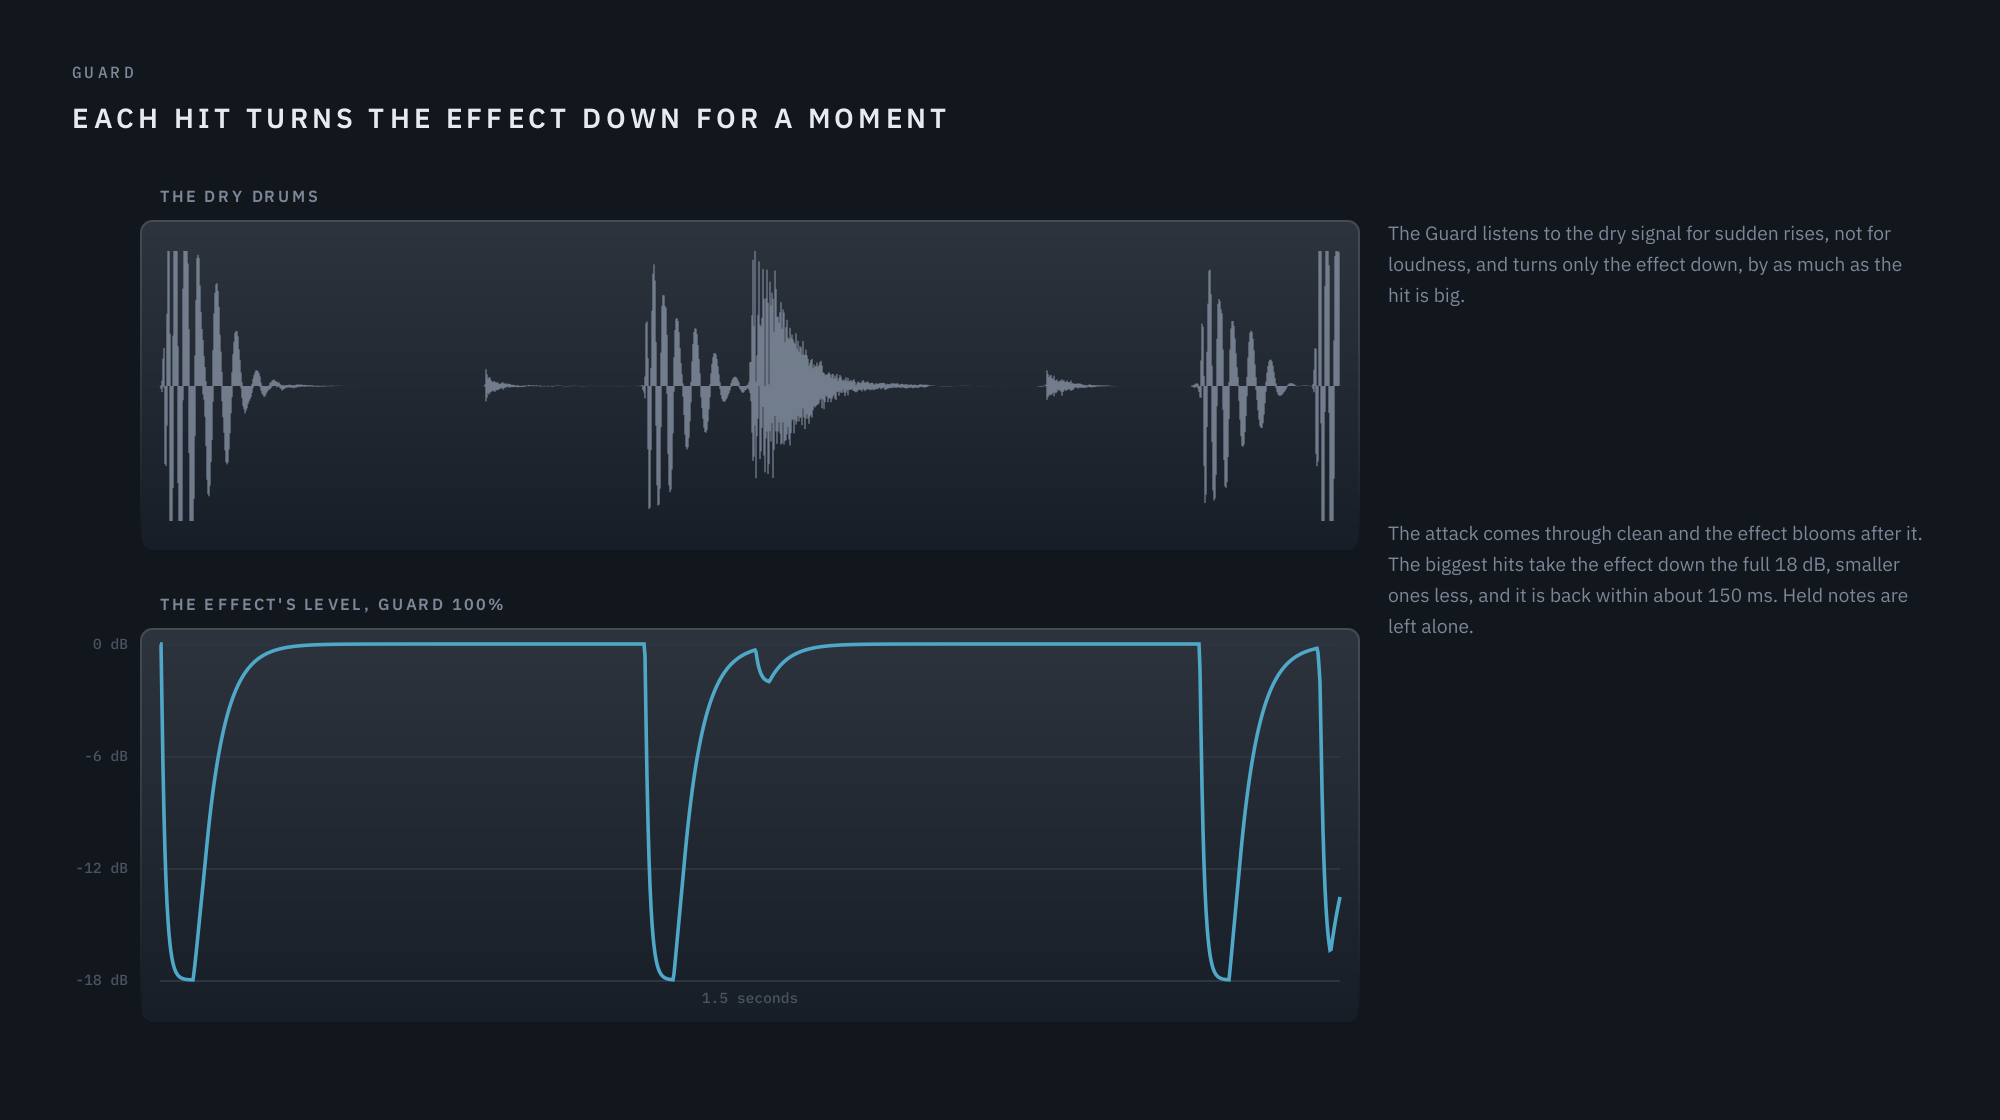
Turns the effect down for a moment after each hit or pick, so attacks come through clean and the effect blooms after them. It listens to the dry signal for sudden rises, not for loudness, and ducks by as much as the hit is big: up to 18 dB at 100%, recovering within about 150 ms. Held notes are left alone.
Through-zero
On / Off · default Off
Holds the dry signal back 5 ms so the flanger’s sweep can pass through it: the tape jet. It acts around the flanger station: fully near it, fading out by Morph 25% and 75%, and parking Stretch while it works. It stands aside for Key, for notes you play and for Rise and Fall, which need the loop’s own delay; the 5 ms stays. While it is on, Prismwave reports 5 ms of latency to your DAW. See chapter 02.
Switching it is not instant: the sound fades out, stays silent for about 30 ms while the engines start again empty, and comes back, and the latency your DAW is told changes with it. Switch it while stopped, or expect that short gap; some hosts only take up the new latency when playback next starts.
At zero
Cancel · Swell · default Swell
What happens where the sweep crosses the dry. Swell: the two copies add, and the sound rises. Cancel: the effect is turned over, so the sound drops, as far as Cancel to allows.
Cancel to
Full – -3 dB · default -12 dB
In Cancel, how deep every notch goes while Through-zero is working, with Mix at 50%: the drop where the sweep crosses the dry, and every other notch of the flange with it. Full, at the bottom, is the classic tape jet, cancelling completely; -12 dB keeps the jet’s shape and spares the low end; toward -3 dB the whole flange grows shallow. It works by how far the effect is turned over, which is why it reaches every notch and not the crossing alone.
EQ — A three-band Dynamic EQ on the effect alone, after the engines and before the Guard. Behind the EQ button, bottom left.
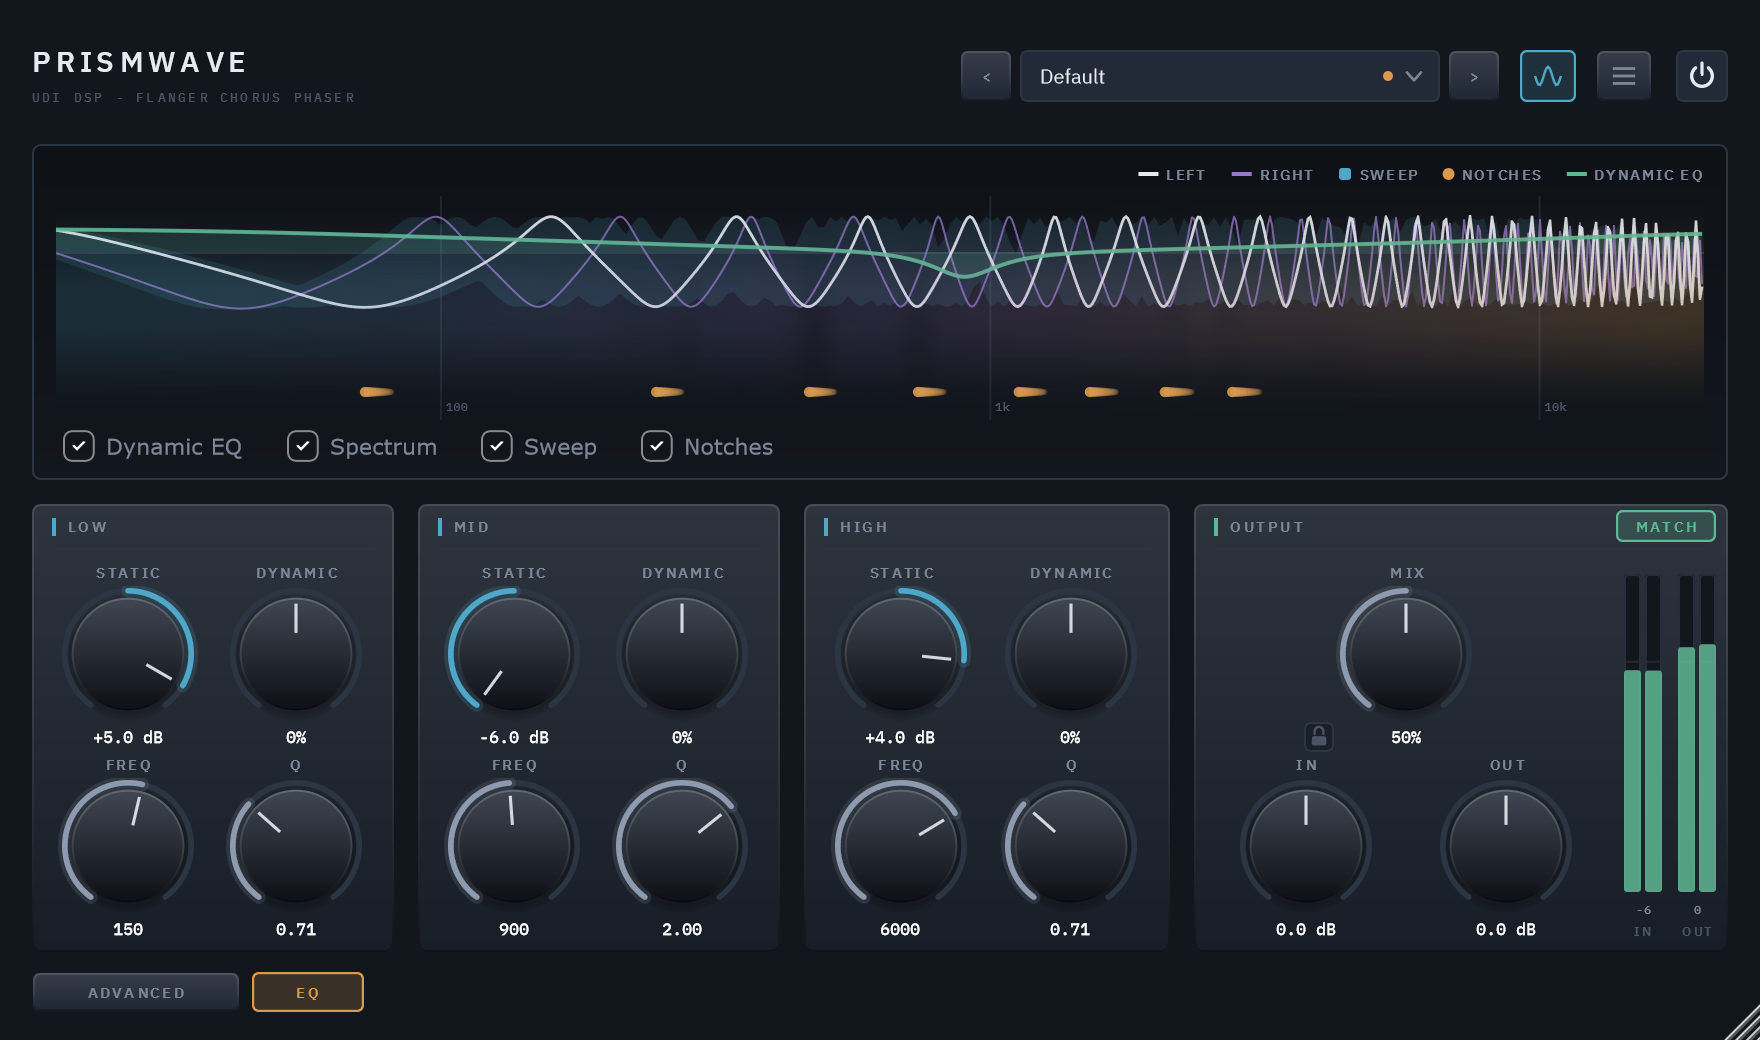
Low / Mid / High — Static, Dynamic, Freq, Q
Static ±6 dB · Dynamic ±100% · Q 0.3 – 4.0 · default 0 dB / 0%
A Low shelf (Freq 20 Hz – 1 kHz, default 200 Hz), a Mid bell (200 Hz – 8 kHz, default 1 kHz) and a High shelf (1.5 – 16 kHz, default 5 kHz). Static is a steady boost or cut. Dynamic reacts to the band’s own level: negative cuts the band when it gets loud, positive lifts it; the two stack. Freq moves the band and Q sets its width. With every band at 0 the EQ does nothing at all. The display draws its curve in green.
07 Playing Prismwave: Key, Ring and MIDI
A feedback loop with enough feedback stops being a flanger and becomes a resonator: it rings. Key decides what note it rings on, Ring decides how long, and Notes decides how loud the notes you play sit against the rest of the effect. With MIDI routed to Prismwave, held notes do the same thing one note at a time, up to eight at once — chords over whatever audio is passing through.
The four controls, in TUNING on the Advanced page
| Control | What it does |
|---|---|
| Key | The note the loop is tuned to, from C to B, or Off. With nothing played, that note rings on its own — a drone in the track’s key. |
| Octave | Which octave that note sits in, 1 to 4, counted with middle C as C4. Octave 1 runs from 33 to 62 Hz and holds the bottom of a bass guitar (its low E is 41 Hz); octave 2, from 65 Hz, is the bass guitar’s middle; octave 3 starts at 131 Hz; octave 4 starts at middle C, 262 Hz. A DAW that calls middle C “C3” shows each of these one octave lower. |
| Ring | How long a tuned note rings on. Below about 80% it is a colour rather than a pitch; near 100% it sustains like a struck string. It rings both Key’s own note and anything you play; above 85% the notes you play are turned down a little (4.5 dB at 100%), so they stay under the ceiling. |
| Notes | How loud the notes you play sit against the rest of the effect, from Off to +12 dB. It does nothing until MIDI arrives. |
Three things follow from how it works. The sweep stops while Key is on: moving a tuned loop even slightly detunes it, so Rate and Depth, and Rise and Fall, wait until you set Key to Off. A note you play has a loop of its own, which stands still, so the flanger keeps sweeping underneath it; and while a note is held Key’s drone steps aside, which brings the sweep and Regen back until you let go. Regen changes job: with Key on, Ring carries the ring and Regen only chooses the tone — positive for the full harmonic series, negative for the hollow, odd-harmonics-only sound — and a played note is always the full series. And Through-zero stands aside for Key and for played notes: the loop cannot be tuned and run in the dry signal’s own time at once.
Four sounds to start from
A drone in the track’s key. Morph to Flanger, Stretch 0, Key on the root of the song, Octave 2, Ring 85%, Mix 40%. A pitched hum under the track that agrees with the harmony instead of fighting it. Turn Ring down toward 70% for a colour rather than a note; move Octave up for something that sings over the top rather than underneath.
Chords over a loop. Key Off, Ring 90%, Notes +3 dB, Mix 50%, and a MIDI track routed to Prismwave. Play and hold a chord: each note opens a resonance and the loop you are treating excites them, so the pad you hear is made of your own audio. Let go and it decays away. Hold notes with one hand and turn Morph with the other — the resonances travel with it and fade out as you reach the chorus end.
A struck bell. Key on the root, Octave 3, Ring 95%, Stretch 50%, Mix 50%. Stretch bends the harmonics above the root out of tune, so a tuned string becomes something struck — metal rather than gut. Drums and percussion pull the most out of this one.
A tuned room. Key on the root, Octave 1, Ring 65%, Loop LP around 3 kHz, Mix 30%. The low note supports the track without a pitch standing out, and the loop’s low-pass takes the metal off each repeat.
What to expect
The ring is bright and metallic by nature: that is what a feedback comb is, and it is the plucked-string sound this borrows. Loop LP around 3–5 kHz damps each repeat, Stretch moves it from string toward bell, and lower Ring leaves a colour instead of a note.
A louder input pulls a note slightly flat — as much as 20 cents when the loop is driven hard — in the same way a real resonator does when it is hit hard. It is the level of the audio that does it, not how hard you play the key. Trim the input if you want the tuning to hold exactly.
Notes reach from the phaser to the flanger, stay in tune for as long as they ring, and fade out by three quarters of the way to the chorus, where Morph has taken away the feedback a note needs. They play from C1 up, as Key does (MIDI note 24, which a DAW that calls middle C “C3” shows as C0); below that a loop is so long it echoes rather than rings, so lower notes are ignored. The notes ring the audio passing through, so they need some: on a silent track there is nothing to ring. A chord is levelled to about the loudness of one note. And only the notes you actually hold cost anything: one note is far cheaper than eight.
08 Sound recipes
Each recipe is a sound, the settings that make it, and what each setting does for it. Most start from a factory preset, so you can load it and hear the result before you change anything. Only the controls that matter are listed; everything else stays at its default. The reasons are the useful part: they tell you which knob to reach for when you want the same sound a little different. For tuned sounds, such as drones, bells in key and chords played from MIDI, see chapter 07.
The jet flanger
Start from Guitar/Jet Flanger. The classic whoosh: a pitched comb sweeping slowly through the sound, whistling as it goes.
- Morph at Flanger gives the dense, evenly spaced comb a flanger is. Even spacing is a harmonic series, which is why the whoosh has a pitch.
- Rate 0.10 Hz takes ten seconds over one cycle. A jet is a slow sweep; speed it up much past 1 Hz and it becomes a wobble.
- Depth 90% lets the notches travel nearly an octave each way, so the pitch of the whoosh really moves.
- Regen +80% rings the comb, and that ring is the whistle. Lower, it is a gentle swirl; higher, it screams.
- Loop LP 7 kHz (Advanced) takes the fizz off every repeat, so high Regen stays smooth rather than harsh.
- Spread 60° puts the two channels a little out of step: wide, but still heard as one sweep.
Try: Regen at -80% for a hollow jet an octave lower. On drums, load Drums/Jet Drums, where Guard 60% lets each hit through clean before the sweep blooms behind it.
Tape flanging, through zero
Start from Guitar/Tape Flange. Two tape machines running side by side, one slowed with a thumb on the reel: the sweep passes right through the dry sound, and the whole mix seems to take off.
- Through-zero On (Advanced) holds the dry back 5 ms so the sweep can pass through it. Nearing the crossing, the notches rush out of the top of the band, and that rush is the jet.
- At zero: Cancel turns the effect over, so the crossing is a dip in the sound rather than a swell. Cancel to -12 dB keeps the dip’s shape and spares the low end; set it to Full for the classic complete cancellation, as Sound Design/Zero Crossing does.
- Regen +20%: tape flanging is two copies of the sound, not a resonator, so the feedback stays low.
- Spread 0°: both channels cross together, as two tape machines would.
- Rate 0.15 Hz, Depth 80%: a slow cycle that swings far either side of the crossing.
Try: At zero: Swell for a crossing that rises instead of dipping, as Vocals/Tape Flanged Vocal does. Prismwave reports the 5 ms to your DAW, which keeps the track in time with the rest.
A wide chorus that stays solid in mono
Start from Guitar/Clean Chorus. Thick, wide and shimmering, and still solid when the mix is folded to mono.
- Morph at Chorus: long delays and three voices, so you hear pitch drift, like two players, rather than a comb.
- Rate 0.6 Hz, Depth 35%: a gentle, even detune. Push either much further and the pitch starts to wobble.
- Spread 150°: the left and right voices move nearly opposite each other, which is the width.
- LF Split 150 Hz (Advanced): below it the sound skips the effect and stays centred, so the low end cannot hollow out or cancel in mono. On top of that, Prismwave keeps the lowest octaves dry by itself while the chorus voices are in.
- Mix 45%: a chorus thickens the sound, and under half it supports the original rather than replacing it.
Try: Guitar/Double Tracker, the subtler cousin: Depth 15%, Spread 180°, Mix 35%, and Manual -0.8 for longer delays, so it sounds like a second take rather than an effect.
A struck bell, with the sweep parked
Start from Sound Design/Inharmonic Bells. Not a sweep at all but an object: every hit rings like struck metal.
- Depth 0% parks the sweep. The notches stand still, so what you hear is a resonance, not a motion.
- Stretch 100% re-spaces the comb the way a stiff bar spaces its partials. The harmonics bend out of tune, from string toward bell.
- Regen +90% makes it ring long; lower it for a shorter, drier knock.
- Loop HP 300 Hz (Advanced) keeps the low end out of the ring, so it sounds like a bell and not a gong.
- Mix 60%: enough ring to hear the object, with the original still underneath.
Try: Guitar/Struck Strings (Stretch 60%, Regen +65%, Loop LP 9 kHz) for struck strings, or Drums/Struck Kit, where Guard 40% keeps each hit sharp before it rings. Manual moves the object up or down. With Stretch at 0 the same idea gives a pitched metal resonator: Sound Design/Metallic Resonator.
An endless climb
Start from Default. The notches rise and never come back, like the stripes on a barber’s pole: tension for a build, or a slow shimmer on a pad.
- Shape: Rise (the button in SWEEP’s title): three copies of the engine an octave apart take turns, each fading in at the bottom and out at the top, so the climb never restarts.
- Morph at Phaser: a phaser’s few broad notches make the climb easiest to follow. At the flanger it becomes a denser, metallic climb.
- Regen +60% sharpens the pattern, so the climb is heard as a rising tone rather than a vague swirl.
- Rate synced to 1 Bar: Rise climbs one octave per cycle, so this rises an octave every bar, in time with the song. Free, 0.30 Hz climbs 0.3 octaves a second.
- Mix 60%, so the climb leads.
- Manual centres the climb; Depth has no effect here.
Try: Fall for the reverse, heading into a drop. A climb costs about twice the processing while it is on.
A phaser that circles the source
Start from Guitar/Slow Phase Swirl, then set up the Modulator. The guitar stays put in the middle while the phasing travels around it.
- Morph at Phaser, Rate 0.12 Hz, Depth 90%, Regen +60%, from the preset: a slow, deep, resonant phaser.
- Modulator: LFO, Dest A Pan, Depth A 100% (Advanced): the Modulator swings Pan from one side to the other. Pan moves only the effect, so the dry guitar stays planted while the phasing moves.
- Sync both rates to 4 bars and set Phase to 90°: with the two on the same cycle, the pan and the sweep run a quarter cycle apart, so the motion goes round rather than pulsing back and forth.
- Spread 120°, from the preset, keeps the phasing wide as it moves.
Try: a free Modulator Rate a little off the sweep’s, such as 0.10 Hz against 0.12 Hz, so the pan and the sweep drift in and out of step and the pattern never quite repeats.
Phaser in the lows, chorus on top
Start from Guitar/Lead Split. Two effects at once, each where it works best: phasing in the body of the sound, a shimmer on top.
- Diverge 100% pulls the two engines to the ends of Morph: engine A to the phaser, engine B to the chorus.
- Routing: Crossover, Split 900 Hz (Advanced): engine A plays below 900 Hz and engine B above, with the dry split the same way so the two halves line up.
- Regen +40% gives the phaser half some bite. The chorus half has no feedback in any case.
- Rate 0.35 Hz: one unhurried sweep for both.
Try: Routing: L / R for the phaser on the left and the chorus on the right, as Synth & Pads/Two Worlds does. At 100% Diverge the pair spans phaser to chorus wherever Morph sits; turn Diverge down to about 60% and Morph moves the pair again.
A pad that evolves across a phrase
Start from Synth & Pads/Evolving Pad. Put it on a long pad and leave it: over half a minute it travels from phaser through flanger to chorus and back.
- Modulator: LFO, Rate 0.03 Hz, Dest A Morph, Depth A 100% (Advanced): one cycle takes about 33 seconds, and at 100% Morph reaches exactly the phaser at one end of the swing and the chorus at the other.
- Morph at Flanger: the middle of the swing.
- Rate 0.2 Hz, Spread 120°: the sweep keeps moving underneath, wide, while Morph travels.
Try: sync the Modulator to 8 or 16 bars so the journey lines up with the arrangement. Put Dest B on Stretch to bend the pattern toward a bell as it travels; Synth & Pads/Inharmonic Drift moves Stretch alone.
A phaser that follows your playing
Start from Bass/Envelope Phaser. Play softly and it barely moves; dig in and the sweep opens right up.
- Modulator: Envelope, Dest A Sweep, Depth A 90% (Advanced): the Envelope follows the input’s level and turns Depth up with it, so harder notes sweep further.
- Depth 20%: how far the sweep travels when you play softly. The Envelope adds the rest.
- Morph at Phaser, Rate 1.5 Hz, Regen +55%, Manual -0.5: a quick, vocal phaser sitting low enough for a bass.
- Spread 0° keeps a bass centred and solid.
- LF Split 80 Hz keeps the fundamental out of the effect.
- Mix 55%.
Try: Dest A on Morph instead, as Sound Design/Envelope Morph does: soft notes sit at the phaser, and loud ones push toward the chorus.
09 Presets
50 factory presets ship with Prismwave, plus Default, which holds no settings of its own: loading it returns every control to its default. A new instance opens on Default.
They are organised by instrument and use, into eight categories, each its own submenu of Factory in the preset menu:
| Category | Presets |
|---|---|
| Guitar | Funk Phaser, Slow Phase Swirl, Jet Flanger, Tape Flange, Clean Chorus, Double Tracker, Struck Strings, Lead Split |
| Bass | Bass Chorus, Envelope Phaser, Fretless Flange, Top-End Chorus, Slow Bass Phaser |
| Keys | Electric Piano Phaser, Warm Keys Chorus, Clav Flange, Organ Swirl, Piano Width, Bell Keys |
| Synth & Pads | Evolving Pad, String Ensemble, Poly Chorus, Resonant Sweep, Inharmonic Drift, Two Worlds, Note Pulse |
| Vocals | Vocal Doubler, Psychedelic Phaser, Tape Flanged Vocal, Wide Backing Vocals, Metal Voice |
| Drums | Jet Drums, Hi-Hat Phaser, Tape Flanged Break, Struck Kit, Drum Width, Metal Kit |
| Mix Bus | Gentle Width, Breakdown Sweep, Phased Breakdown, Tape Wobble, Air Chorus |
| Sound Design | Metallic Resonator, Inharmonic Bells, Hollow Tube, Random Swarm, Envelope Morph, Zero Crossing, Frozen Comb, Split Personality |
Loading any preset sets every control, so each is a complete starting point rather than a change to what you had. The arrows either side of the preset field step through the presets in order and stop at either end. Match stays on in all of them, so you can compare presets by sound rather than by level. To audition them at your own blend and levels instead, lock OUTPUT first (the padlock beside Mix, chapter 06): Mix, In and Out then stay where you set them.
10 Technical specifications
| Format | VST3 (Windows x64), Standalone app included — AU / macOS not yet available |
| Channels | Mono in and out, or stereo in and out. On a mono track Spread and Pan have nothing to move, and L / R plays engine A |
| MIDI | MIDI in, for playing notes into the loop: eight at once, from C1 up (chapter 07) |
| Latency | 0 samples; 5 ms while Through-zero is on, reported to the host |
| Bypass | The power switch at the top right, a 20 ms crossfade |
| Engine | Two engines, each a modulated delay with up to three voices, four allpass sections and a softly saturated feedback loop |
| Morph | Phaser, Flanger, Chorus, continuous |
| Loudness | Match, on by default; a peak limiter from -0.3 dBFS, nothing past 0 dBFS, while the effect is in |
| Parameters | 52, all automatable |
| Factory presets | 50, in eight categories, plus Default |
| CPU (measured) | About 1% of one core: 1.1% at the defaults, 0.9% at the phaser, 1.1% at full Stretch and with Through-zero on; 1.8% with a Rise or Fall sweep; 2.4% with eight MIDI notes held; 0.1% on silence, once the ring has died away — @ 48 kHz stereo, 512-sample blocks |
| Tail | Worked out from the settings as they stand and reported to the host: about 1.4 s at the defaults, more as Regen, Ring and Stretch rise, 60 s at the most |
| Licensing | 14-day trial, then activation through Moonbase, online or offline |
| Shares with the UDI DSP line | Dynamic EQ, preset system, licensing, UI toolkit |